DK Custom PROJECT TRI-GLIDE Report w/ Lots of Pics

We planned to do a lot more this week than we ended up doing. Got distracted by some sunny weather and a new shop near us. He has a dyno for Trikes and we rode over and got acquainted.

I think he'll be our new go-to guy when we need to put a bike or trike on the dyno to test out new parts! ThumbUp

While we were there we pulled Devin's Street Glide up on the Dyno and did a few pulls. 112 ft lbs of torque...and That is the reason he can blow by me like I'm standing still when I'm doing 80 mph. :laugh:

Since we took the Long way there and the Long way back, we did get in some fun riding, but had little time left to work on the TG project.


We had already made up some LED's that were the proper length for the mud flaps..so we did do a little mocking up to verify everything, and measure how long to make the wires.

We started with these stock Kury Mud Flaps-

KuryMudFlap_zpskan1qnke.jpg


We then removed the two chrome ribs in the flap.

Here is a pic of the back of the flaps. Upper left one shows the plate with the two chrome ribs. Lower right shows the new curved plate that we made to hold the curved form of the flap, and to give the LED's a back to stick against.

New%20Backs%20for%20Mud%20Flaps_zpsfyypo3or.jpg


Last pic is the show side of the mud flap. The LED's have not been affixed to the plate we made, they are not curved yet.

LEDs%20for%20Mud%20Flaps_zpsw1ag3xwi.jpg


Next week we'll make the wiring, affix the LED's to the flap backing and get them installed.

I thinks it's going to be better than originally envisioned! :)

Kevin
 
I can't wait to see what you've come up with as far as the wind deflectors go. I don't really want them for deflecting wind off my body necessarily, but I would like them for the channeling of the air onto the engine. Anything to lower the temp a few degrees is what I'm after.

BTW, any news on developing an oil cooler yet?
 
Kury Mud Flaps

Kevin, on my '11 Tri I installed the H-D mud flaps. So, after you install wiring and complete your testing will you be selling these as a complete kit or just LED? Thanks DJ
 
I can't wait to see what you've come up with as far as the wind deflectors go. I don't really want them for deflecting wind off my body necessarily, but I would like them for the channeling of the air onto the engine. Anything to lower the temp a few degrees is what I'm after.

BTW, any news on developing an oil cooler yet?

We are now on our 5th version of the wind deflectors. They're getting a bit better each version. Can't say this will be the final version....but we're getting closer. :) Three things we're taking into consideration- less wind on the rider/passenger, more wind on the engine & aesthetics.

Oil cooler and oil filter relocation parts are scheduled to be powder coated this week. :)


Kevin, on my '11 Tri I installed the H-D mud flaps. So, after you install wiring and complete your testing will you be selling these as a complete kit or just LED? Thanks DJ

That's a possibility, but we still are just "thinking"/ hoping it will be a mod we like...until we have it installed and look at it during the day and night, we're not even sure we'll like it.

We have a lot of ideas, and many of them turn out good or great, but some just end up in a pile because they did not work out how we thought they would...but I gotta say, I am liking this one so far, and can't see any problems with it...but that is what testing is for. :)

Kevin
 
We planned to do a lot more this week than we ended up doing. Got distracted by some sunny weather and a new shop near us. He has a dyno for Trikes and we rode over and got acquainted.

I think he'll be our new go-to guy when we need to put a bike or trike on the dyno to test out new parts! ThumbUp

We started with these stock Kury Mud Flaps-

Next week we'll make the wiring, affix the LED's to the flap backing and get them installed.

I thinks it's going to be better than originally envisioned! :)

Kevin

Any chance you'd be thinking of doing the same thing to the HD mud flaps? Not looking to put that chrome on the back of my bike - But really like the look....
 
Smoked Lens for Front Fender

  • Researching if we can get a smoked out lens for the front fender. If anyone has any leads on this, would be appreciated.

The only one I can find for a '15 Tri is through Custom Dynamics
Front Fender Tips for '14 and Newer HD Touring
Fits: Ultra Classic, Electra Glide, and Road King Families
Direct replacement for front fender OEM Light or decorative piece (Road King)
Choice or Amber or White LEDs
Choice of Clear, Smoke, or Amber Lens
Choice of Chrome or Gloss Black Finish
Item : GEN-FT-LED
$94.95

It doesn't Specifically say for a Tri, but I am pretty sure (and correct me if I am wrong), but the '14 and newer Ultra and Electra have the same front fender.
 
Any chance you'd be thinking of doing the same thing to the HD mud flaps? Not looking to put that chrome on the back of my bike - But really like the look....

Not sure that the HD brand mud flap will work the same way as the Kury. But if all goes well with what we're working on, then I think it will be transferable to the HD flaps in a similar form.


  • Researching if we can get a smoked out lens for the front fender. If anyone has any leads on this, would be appreciated.

The only one I can find for a '15 Tri is through Custom Dynamics
Front Fender Tips for '14 and Newer HD Touring
Fits: Ultra Classic, Electra Glide, and Road King Families
Direct replacement for front fender OEM Light or decorative piece (Road King)
Choice or Amber or White LEDs
Choice of Clear, Smoke, or Amber Lens
Choice of Chrome or Gloss Black Finish
Item : GEN-FT-LED
$94.95

It doesn't Specifically say for a Tri, but I am pretty sure (and correct me if I am wrong), but the '14 and newer Ultra and Electra have the same front fender.

Thank you! ThumbUp I saw they also have the low profile smoked rear fender lights. :)


Kevin
 
  • Researching if we can get a smoked out lens for the front fender. If anyone has any leads on this, would be appreciated.

The only one I can find for a '15 Tri is through Custom Dynamics
Front Fender Tips for '14 and Newer HD Touring
Fits: Ultra Classic, Electra Glide, and Road King Families
Direct replacement for front fender OEM Light or decorative piece (Road King)
Choice or Amber or White LEDs
Choice of Clear, Smoke, or Amber Lens
Choice of Chrome or Gloss Black Finish
Item : GEN-FT-LED
$94.95

It doesn't Specifically say for a Tri, but I am pretty sure (and correct me if I am wrong), but the '14 and newer Ultra and Electra have the same front fender.

Unlike the 13" and older, you can no longer just change the lens on the front fender. Unwilling to pay a min. of $100 for a Smoke lens assembly - I used vinyl - turned out great. I love a good Hack - lol
Lens (1).jpgLens (3).jpg
 
Here are a couple of pics of the Extended Skirt for the Front Fender that NHBAGGER sent us. :)


It is made of polished stainless steel. It still has the protective wrap on it.


FrontFenderFlap1_zpscfxmkoca.jpg


Here's the other side...not polished. It is about 2" longer than the stock and will go in place of the stock one.


FrontFenderFlap2_zpspvvj7ieo.jpg


Thank you Richard!!! ThumbUp


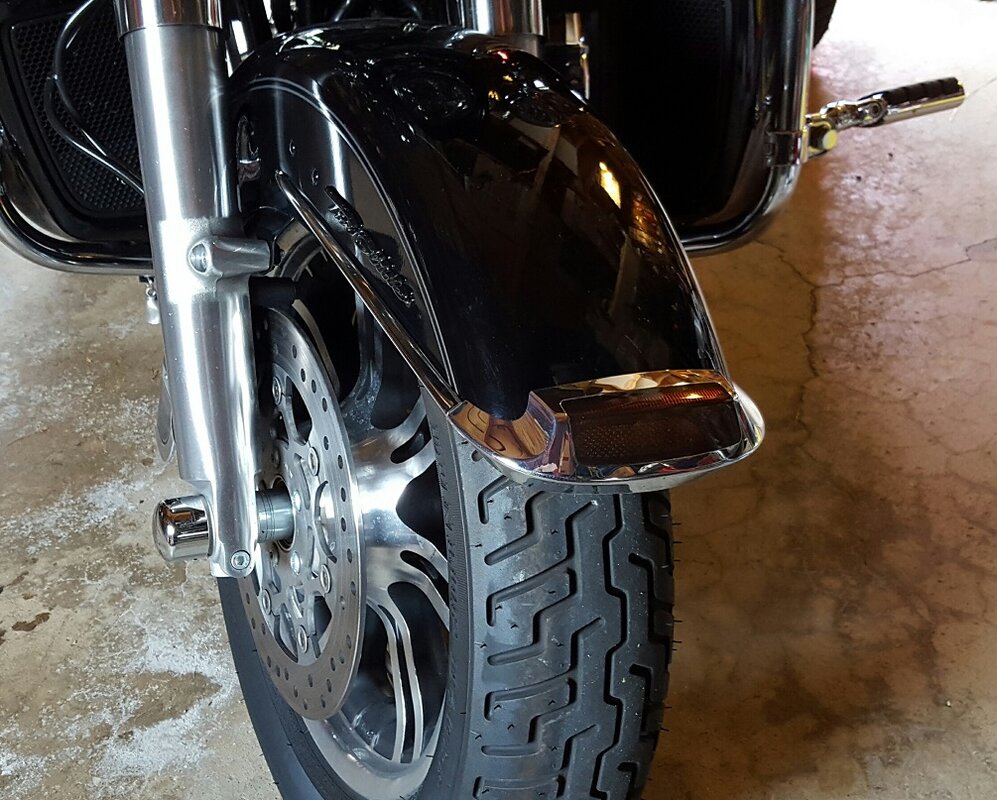
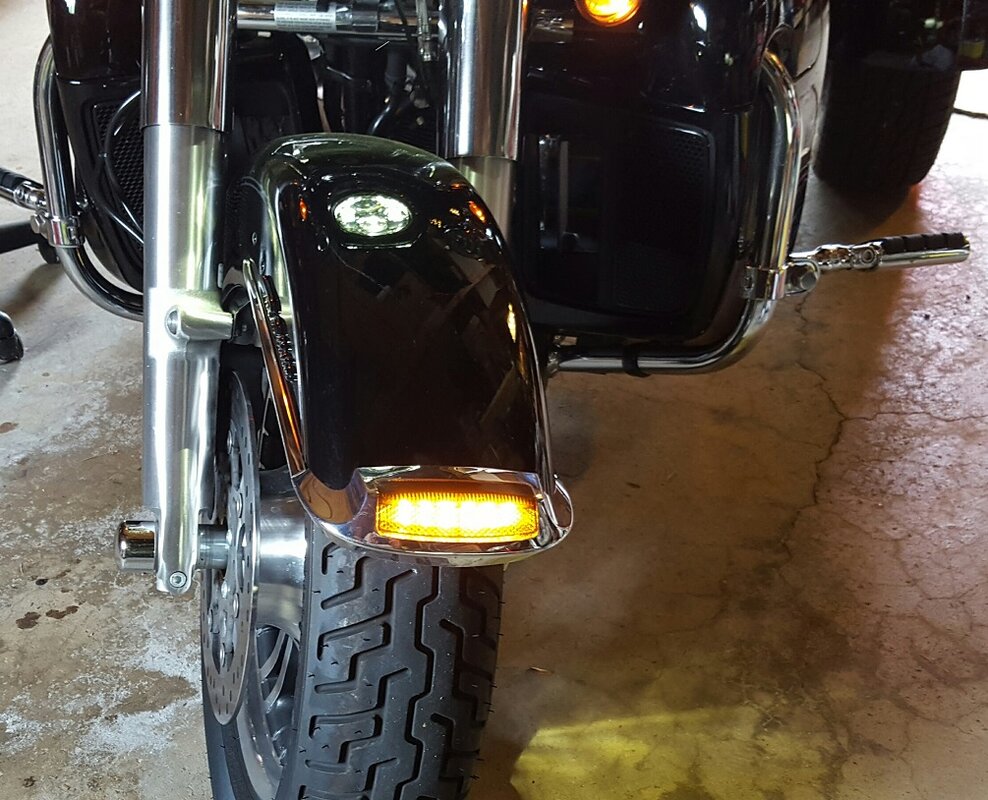
Today we got the prototype mud flaps installed and wired up (and silicone sealed)-


MudFlapInstall_zpsvona4pnh.jpg


Lights out -


MudFlapLitUp_zps6fnmtkdz.jpg


Lights back on -


MudFlapLitUp2_zpszkwxekpn.jpg


I am super happy with how they look. Turned out even better than I expected. :)


Over the next few weeks I will be trying to break them. I don't see any reason why the will fail, but a bunch of miles, including some of gravel, rain, and maybe some snow, will tell the story.


Kevin

- - - Updated - - -

Unlike the 13" and older, you can no longer just change the lens on the front fender. Unwilling to pay a min. of $100 for a Smoke lens assembly - I used vinyl - turned out great. I love a good Hack - lol
View attachment 33310View attachment 33311


Yeah, I found them...but was squirming at the price a bit. Your's turned out nicely. What vinyl did you use, and is it the stock bulb still?

Kevin
 
Kury mud flap

Kevin, I like the LED lighted mud flap. Did you say they will be lights, brake and turn signal LED's?

It looks like the kury mud flap mounting would cover the HD mud flap holes once removed, I hope. DJ
 
55il

The Kuryakyn mud flaps use the two holes already there from the Harley mudflap. You would only have to drill 1 hole. Kuryakyn has this in the instructions that come with their mud flaps
 
Kevin, I like the LED lighted mud flap. Did you say they will be lights, brake and turn signal LED's?


It looks like the kury mud flap mounting would cover the HD mud flap holes once removed, I hope. DJ

Yes, they are Run-Brake-Turn. I will be getting some pics & video outside, during day and night this coming week.

As bronxbill noted, these mud flaps use the to HD mud flap holes, making the switch easy.


Great job on those mudflaps - sure hope you can come up with a way
to de-chrome them though......
:Shrug:

De-chroming them is easy. We already pulled out the chrome strips and replaced them with LED's. The top chrome piece is stand-alone metal before installation. So it would be easy to rough it up and paint or powder coat it.

Kevin
 
Wiring

Yes, they are Run-Brake-Turn. I will be getting some pics & video outside, during day and night this coming week.

As bronxbill noted, these mud flaps use the to HD mud flap holes, making the switch easy.


De-chroming them is easy. We already pulled out the chrome strips and replaced them with LED's. The top chrome piece is stand-alone metal before installation. So it would be easy to rough it up and paint or powder coat it.

Kevin


Kevin,

Is there any problem wiring them in? I know a lot of the things on these newer bikes are run thru the Can-Bus system and didn't know if had a module for that or just paralleled the existing lights/LED's. Looking forward to DK putting them up for sale.

Thanks,
 
Kevin,

Is there any problem wiring them in? I know a lot of the things on these newer bikes are run thru the Can-Bus system and didn't know if had a module for that or just paralleled the existing lights/LED's. Looking forward to DK putting them up for sale.

Thanks,

That's a CANbus TG it's installed on. Running right off the same wires feeding the fender lights. No problems, no error codes.

Kevin
 
This morning was a light rain when I left for the shop, but it was sunny and 60* when I headed home.

Great day to test out the Mud-flaps.

Here are a few pics in the morning, before I left.

MudFlaps5_zps3kv2r75v.jpg


MudFlaps7_zpsf5wie5un.jpg


MudFlaps4_zps1fdfpfg2.jpg


I really like how they turned out!


They did their mud-flap thing in the wet gravel and rainy roads.

It definitely felt good knowing those four bright strips of light were doing their thing when braking and signaling when I got in some traffic. Hard to miss.


Here are a couple of shots in the shop parking lot...took these before taking the long twisty route home. :)

MudFlaps9_zpsm39jcb1m.jpg


MudFlaps8_zpspng85ii1.jpg


Only got about 100 miles on them so far...will subject them to some more abuse to make sure they are solid.


When we were visiting Fuzzy last summer he explained to me how much better it was to have an extended & lowered brake pedal.

A month or so ago I installed one on my Softail. Whoa! Added floorboard room was a plus, and it was a HUGE difference in comfort, speed and control in braking.

I just installed an extended and lowered brake arm on the TG last night, so today was the first time riding with it.

Just like on the Softail, it is a big improvement in comfort and makes braking more natural, easier and faster.

Here are a couple of pics.

TwinCooled%20Brake%20Arm4_zpsapgm4rqh.jpg


TwinCooled%20Brake%20Arm5_zpsipuviqa9.jpg


Kevin
 
Got a couple hundred more miles on the mud flaps. A lot of it in the rain. Still looking good!

Running lights are nice and bright-

MudFlapRunningNight_zps466td41k.jpg


Brake lights and turn signals are crazy bright...probably enough to catch the peripheral vision of a texter. :)

MudFlapBrakeNight_zpsgneqa7ax.jpg


Below is a video of a walk around the TG showing:

UP FRONT

Stealth LED Driving Lights mounted on the engine guard
Stealth LED Running Lights/Turn Signals mounted around the forks
Running Lights/Turn Signals mounted Inside the fairing vent

RIGHT & LEFT SIDE

Running Lights/Turn Signals mounted inside the Lower Fairings, and plainly visible from the side


IN BACK

Run-Brake-Turn LED integrated into the Mud Flaps.


Click HERE to see the video.


Kevin
 
Got a couple hundred more miles on the mud flaps. A lot of it in the rain. Still looking good!


I to hope you move along quickly on these. Spring is coming quick. The extra lighting would be a huge saftey factor for all who install them. I hope to be placing the order soon! Thank you for DK's R & D work.

Tomorrow is Project Tri-Glide day for Devin & myself.

I've been riding all week, trying to break these...lots of rain, burn-outs in gravel, etc. They are holding up well. I think we will get started on them soon. :)

Devin is having ACL surgery next Thursday, but hopefully we will get it drawn up and get the laser work done before then.

If not, it will be about a week after the surgery until he is up and hobbling around.

Kevin
 
Today we spent some more time on the Tour Pak bracket we've been working on.

At one point we had given up on it. There are several more odd bends in it that it seems at first glance.

But we are back at it with a new plan!

Here's notes that we have made to supplement our CAD/CAM drawings. :laugh:

TP%20Bracket%20in%20works_zpslzaolrln.jpg


After that we removed the prototype Oil Filter Relocation and prototype oil cooler.

I've been running the prototypes for close to 4000 miles, and almost 2000 miles of that was running the 68 mile test run route, over and over again. lol

It was nice to finally be installing a finished product.

I opted to go with the braided fiber lines, and black hose finishers.

Here's the adapter, where the oil filter normally goes-

Where%20Oil%20Filter%20Normally%20goes_zpsr1tu4obm.jpg


The first part of the bracket, under the left passenger floorboard/peg-

Filter%20Bracket%201_zps376r5t3a.jpg


The second half of the bracket, prior to install-

Filter%20Bracket%202_zpslocho9ga.jpg


Installed-

Bracket%20Installed_zpsdwt17ymq.jpg


With oil filter-

Bracket%20Installed%20with%20Filter_zps3arvblek.jpg


Never again will I have to deal with a messy oil filter removal!

:)

Plus, our tests with the oil filter out in the wind, we consistently saw 8-10 degree drop in oil temps, and accompanying 3-5 degree drop in engine temp. :)


Next was installing the oil cooler. Not a lot of places for it on the Twin Cool.

This bracket places the cooler directly behind the lower vent. Those two (angled) holes in the bracket channel a surprising amount of air thru to the cylinders for cooling.

Oil%20Cooler%20Bracket_zps0l8bddvt.jpg


Here's the oil cooler installed.

Oil%20Cooler%20Installed_zpsyu3lrgma.jpg


Our tests with the oil filter/oil cooler combo consistently saw a 30-34 degree drop in oil temps, and an accompanying 5-7 degree drop in engine temp. :)

I am very happy with the results. *

Tomorrow I'll be cleaning the TG up a bit and then taking some pics out in the sun.

Kevin
 
Kevin when you shoot the new pictures can you please shoot a couple showing more of where it is mounted from further back. to see the over all look.


Today we spent some more time on the Tour Pak bracket we've been working on.

At one point we had given up on it. There are several more odd bends in it that it seems at first glance.

But we are back at it with a new plan!

Here's notes that we have made to supplement our CAD/CAM drawings. :laugh:

TP%20Bracket%20in%20works_zpslzaolrln.jpg


After that we removed the prototype Oil Filter Relocation and prototype oil cooler.

I've been running the prototypes for close to 4000 miles, and almost 2000 miles of that was running the 68 mile test run route, over and over again. lol

It was nice to finally be installing a finished product.

I opted to go with the braided fiber lines, and black hose finishers.

Here's the adapter, where the oil filter normally goes-

Where%20Oil%20Filter%20Normally%20goes_zpsr1tu4obm.jpg


The first part of the bracket, under the left passenger floorboard/peg-

Filter%20Bracket%201_zps376r5t3a.jpg


The second half of the bracket, prior to install-

Filter%20Bracket%202_zpslocho9ga.jpg


Installed-

Bracket%20Installed_zpsdwt17ymq.jpg


With oil filter-

Bracket%20Installed%20with%20Filter_zps3arvblek.jpg


Never again will I have to deal with a messy oil filter removal!

:)

Plus, our tests with the oil filter out in the wind, we consistently saw 8-10 degree drop in oil temps, and accompanying 3-5 degree drop in engine temp. :)


Next was installing the oil cooler. Not a lot of places for it on the Twin Cool.

This bracket places the cooler directly behind the lower vent. Those two (angled) holes in the bracket channel a surprising amount of air thru to the cylinders for cooling.

Oil%20Cooler%20Bracket_zps0l8bddvt.jpg


Here's the oil cooler installed.

Oil%20Cooler%20Installed_zpsyu3lrgma.jpg


Our tests with the oil filter/oil cooler combo consistently saw a 30-34 degree drop in oil temps, and an accompanying 5-7 degree drop in engine temp. :)

I am very happy with the results. *

Tomorrow I'll be cleaning the TG up a bit and then taking some pics out in the sun.

Kevin
 
Got a couple hundred more miles on the mud flaps. A lot of it in the rain. Still looking good!

Running lights are nice and bright-

MudFlapRunningNight_zps466td41k.jpg


Brake lights and turn signals are crazy bright...probably enough to catch the peripheral vision of a texter. :)

MudFlapBrakeNight_zpsgneqa7ax.jpg


Below is a video of a walk around the TG showing:

UP FRONT

Stealth LED Driving Lights mounted on the engine guard
Stealth LED Running Lights/Turn Signals mounted around the forks
Running Lights/Turn Signals mounted Inside the fairing vent

RIGHT & LEFT SIDE

Running Lights/Turn Signals mounted inside the Lower Fairings, and plainly visible from the side


IN BACK

Run-Brake-Turn LED integrated into the Mud Flaps.


Click HERE to see the video.


Kevin

I CAN SEE YOU!!!!!!! Very nice....and effective!!! ThumbUp ThumbUp ThumbUp
 
Today we spent some more time on the Tour Pak bracket we've been working on.

At one point we had given up on it. There are several more odd bends in it that it seems at first glance.

But we are back at it with a new plan!

Here's notes that we have made to supplement our CAD/CAM drawings. :laugh:

TP%20Bracket%20in%20works_zpslzaolrln.jpg


After that we removed the prototype Oil Filter Relocation and prototype oil cooler.

I've been running the prototypes for close to 4000 miles, and almost 2000 miles of that was running the 68 mile test run route, over and over again. lol

It was nice to finally be installing a finished product.

I opted to go with the braided fiber lines, and black hose finishers.

Here's the adapter, where the oil filter normally goes-

Where%20Oil%20Filter%20Normally%20goes_zpsr1tu4obm.jpg


The first part of the bracket, under the left passenger floorboard/peg-

Filter%20Bracket%201_zps376r5t3a.jpg


The second half of the bracket, prior to install-

Filter%20Bracket%202_zpslocho9ga.jpg


Installed-

Bracket%20Installed_zpsdwt17ymq.jpg


With oil filter-

Bracket%20Installed%20with%20Filter_zps3arvblek.jpg


Never again will I have to deal with a messy oil filter removal!

:)

Plus, our tests with the oil filter out in the wind, we consistently saw 8-10 degree drop in oil temps, and accompanying 3-5 degree drop in engine temp. :)


Next was installing the oil cooler. Not a lot of places for it on the Twin Cool.

This bracket places the cooler directly behind the lower vent. Those two (angled) holes in the bracket channel a surprising amount of air thru to the cylinders for cooling.

Oil%20Cooler%20Bracket_zps0l8bddvt.jpg


Here's the oil cooler installed.

Oil%20Cooler%20Installed_zpsyu3lrgma.jpg


Our tests with the oil filter/oil cooler combo consistently saw a 30-34 degree drop in oil temps, and an accompanying 5-7 degree drop in engine temp. :)

I am very happy with the results. *

Tomorrow I'll be cleaning the TG up a bit and then taking some pics out in the sun.

Kevin

Hi Kevin!! Any idea when remote oil filter system will be for sale? And can you possibly provide a pricing range? Really like the remote filter idea and would consider installing one on my Trike!!

:pepper:

Thanks Kevin!!

Roger
 
Kevin when you shoot the new pictures can you please shoot a couple showing more of where it is mounted from further back. to see the over all look.

Here's a pic of it from further back.

CnC%20DualFlow.jpg


You can see more pics and a full description at this LINK.


Hi Kevin!! Any idea when remote oil filter system will be for sale? And can you possibly provide a pricing range? Really like the remote filter idea and would consider installing one on my Trike!!

:pepper:

Thanks Kevin!!

Roger

Just got it on the website a few minutes ago. Normal price is $174.95, introductory price is $154.95 for the next week.

You can see it, and the Dual-Cool Oil Cooler at this LINK.

Kevin
 

Welcome to the Trike Talk Community

Join our vibrant online community dedicated to all things Trikes! Whether you're a seasoned rider or just starting out, this is the place to share experiences, tips, and stories about your three-wheeled adventures. Explore modifications, maintenance advice, and rides, all while connecting with fellow trike enthusiasts from around the globe

Forum statistics

Threads
55,379
Messages
804,597
Members
23,946
Latest member
redhog99
Back
Top Bottom