My Trike

yes, that does look nice, still might need it of all goes wrong for me.

I have to much time on my hands at times, so not a problem and I need to see what I could do, first time for this work.
 
My two orders came early, so I installed a 6pin wire connector (male and female), so body harness can just unplug from main frame harness.

The new set of Triple Tree's are a bit larger than I expected, but so far all does look like there is room for them to move freely with in the body. Wider front forks means a bit wider tire and rim which means a new fender maybe so all looks right. The main stem is 1" x 8" long on the new set and the old set stem was 3/4" x 9 1/8" long. The extra 1 1/8" was at the top with washers pushing the top tree that extra distance, not sure how all will sit and look right now, but keeping my fingers crossed that all will work out for me.
 
update

So I got to excited and missed the days the shop would be closed, guess it was all last week, so I do not get my extentsion piece until Monday, but I had weeds to pull and some home repairs to take care of so at least when I do get the parts I will have the time to do the work. I found out my daughters boy friend works automotive and has the equipment for bending my backbone, maybe I will have to transport it to his shop, but as long as I can get all done correctly I will be a happy camper.
 
Summer heat is on here in NV, hope are all keeping cool and can enjoy their rides.

I am getting closer, kinda, LOL.

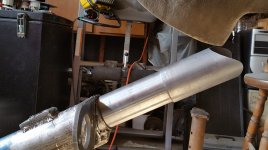
I got the new extension piece back from the machinist, had to do some work on the inside of the backbone tube so it would slide down inside. Just grinding and sanding of old welding spot were they plugged a hole they made so they could fill the backbone with buck shot.

20180716_090304.jpg

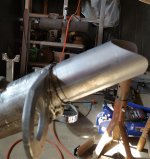
See the welded on mount tap on the top of the backbone, it slides in just past the end of that tab. Kinda a flat spot on the inside and it is hard getting back that far to smooth out. But I can get it to go in far enough that I only have about a 3/16 inch, or less now, before it is all the way in, think leaving a 5/32 inch distance exposed would help secure a good weld ?

20180716_090244.jpg

I did not push all the way in, as it gets sticky and is hard getting out without some lubricant used.
 
Are you asking about weld procedures?

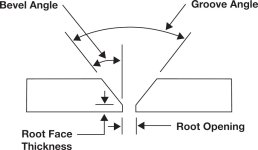
If you want/need a 100% full penetration weld then yes you need to have a gap and do a root pass, then as many stringers as needed to fill the scarf and then a cap weld.

the-next-generation-of-portable-beveling-1.jpg

A weld should be all the way through. Unless it is thin it will take more than one pass to get there.

bevel_weld.jpg

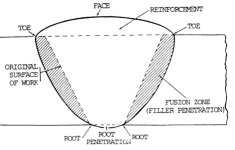
If you do not gap and root the weld it will not be full strength of the base metal. Of course lots of things do not need to be a 100% weld. But I would say a major structural component like that definitely does need it.

weld-fusion5.jpg
 
Yes, that is what I was talking/thinking about, a 100% weld (as close as it can get ), for the extension piece to backbone. And of course we want the best weld we can get for the neck tube to backbone. The machined area for the neck is spot on and tight, but if I use the 2 1/4" dia. HD neck it gives me 1/32" inch clearance on each side so that a root weld can be obtained, but first I do have to grind a bit of an angle to the edge.Okay answered my question, MC bracket has to come off, not a bad thing really, I had just left it as a reference point.Still trying to get a hold of this ( known welder) to do the work, but no luck yet, than I met others and they all "I weld my own trike together" I talk about what I am doing, well all sounds good and should work, I just do not feel confident about welding this, and all I get back is "it is just a matter of getting all cleaned and ready to be welded, use the right material for the job, keep the feed steady and all will be fine". I am just being a pussy "so I am told", but what I heard the most " I do not trust others to do my welding" yet these guys who said this are self taught welders. I will get it figured out, need to get the neck set and done so I can get my forks figured out and made.Never would have gotten this far with out TrikeTalk and the members here. Well maybe eventually, but I am so pleased with help and ideas along with all feedback good or bad.
 
the most critical weld that I see is that area that is under the neck tube, looking at the right side of the last picture.

that weld will be trying to pull apart under load. the sides of the neck tube will be important also.

the weld on top will do very little, except then the fork is off the ground.

Unfortunatly the top weld is the easiest one to make!.....my suggestion would be to rotate the neck so all welds are done in normal position, do the neck weld first, then slide the assembly into the frame tube and weld it last...that weld will not be that critical in my estimation.

You and others may have different/better procedure than I.......just my .02

Lots of welders like to brag about their skills, but give them a critical job, and they get real quiet, real fast:D
 
That is so true Larry, thank you for the advice, was were my mind was.

I have been getting prep work done. Insert piece will slide in and at what distance I want now and got a bevel edge to the backbone tube. She is ready for welding.

I have thought about this, and I to would like the neck tube welded to the insert first, for all the same reasons you stated Larry.

Just waiting to see how this works out, do I find a welder who will do it, or do I just practice up and do it myself ( give it my best try) Thank you all so much for the help and advice.:clapping:
 
Some feedback is needed.

The neck tube does not have the bearing races pressed in yet, so does one weld the neck tube in place and than press the bearing races in?

Or do we press the bearing races in the neck tube and than weld it into place.

Which is easier, pressing them into the neck tube before welding things, or weld the neck tube to the extension piece, than press the races into position, and than weld the extension piece onto the backbone. I think I just found the steps to follow.
 
I would install the races after welding the neck to the extension piece. It will be easy to handle when installing races. Then you can keep the neck somewhat cool i.e." wet rags"etc. when you weld the extension to the backbone. my .02
 
I just realized I can lift up the backbone, block with jack stand, which increase the room under the neck area, so I can put the races in after all is welded.

Just was looking at it with a closed mind, as I have it setting at the desired ride height, which the bottom of the neck is only 23" off the ground, kind of tight for me.

Just the same I think LarryA's method works well. They claim they are suppose to be pressed into the neck tube, or do the set with a hammer and race set tool?

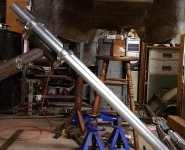
I had to see what I was looking at, so a little mock up pic.

20180728_054408.jpg

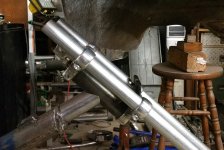
a closer look at the trees.

20180728_054347.jpg

I spent some time trying to get an idea of things, but need to get shit welded so it stops shifting on me. I mainly wanted to see if I could use the 18" rim/wheel instead of the original 16". Now if the drop pivot rocker makes it feel like power steering, would the wider 3" rim be a better match than a 2.5" ? The width between the fork tubes is 5 1/2" and the axle length between tubes will be near 7", so the wider tire would look and ride fine ?

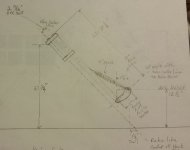
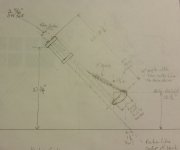
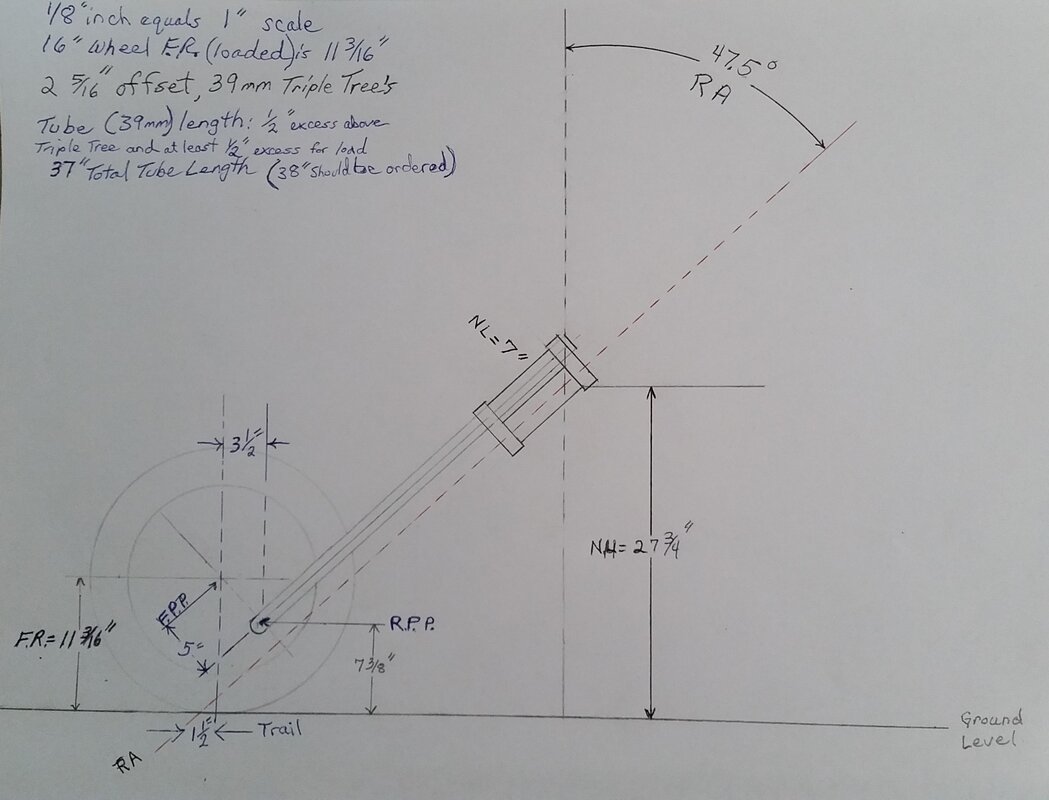
Now I am not set up to build a set of springers, so if that is the style I want I will have to get them made, but when I drew things up I drew in a shock off the rocker arm to the fork tube. Using a 5" drop pivot design rocker arm a nice triangular shape is formed. I will see if I can a pic of the drawing up.
 
10449302_atc_ac3090_pri_larg.jpg
You can rent or buy this set from most Advanced Auto Parts or some other parts stores

They double as seal drivers Makes driving races a lot easier and less cause for damage
 
I seen both being done on a youtube video, I do not think the threaded rod was needed, but provides for a even set of both top and bottom, so it said.

I think the pic of the drawing came out.

20180730_131510.jpg

not sure which one is the better pic.

20180730_131523.jpg

I tried to draw in a shock, that distance could vary a little depending on model of shock used and style of tab coming off the fork tube for shock mounting.

I do not seeing this being unstable, running long rods for the springer fork which is attached higher up on the fork assembly seems less stable than the shock attached to the fork. Again just an estimate until I get the neck welded into place, than I can see the exact measurements and start building the front end, or order it if need be.

I did not see any leading link arm design with a drop pivot like this, or I did and that is why it is in my mind, not sure, but it is on paper, does it work ?
 
Andy, I say buy the race driver set

I have a similar set I bought 35 years ago and I paid a lot more for it:p

It has long since paid for itself ( the drivers are soft on the races so they wont ding em);)
 
The geometry you have drawn there is very very much like mine.

Rockers are short enough to not have to loop around the back.

The spring rate of the shocks will probably make you have to move the shock bottom back away from axle and toward the lower pivot.

Make the lower pivots very robust.

Just for giggles and design exercise.....try spinning the yokes 180 or backwards. If you can get the legs moved back more then you can get the lower pivots even lower.
 
I read about that, think someone else was trying it, interesting thought and makes me want to see about it now, LOL.

If it is to be more inline with a springer design, springer fork tube runs parallel with the main tube, than you are saying match the offset of the top mount to the rocker arm pivot point.

Might even have to design the top mount longer from the main tube, but I think I understand.

For sure a mock up rocker from wood, a few I am sure, will help me find that right pivot point.

Have a good eveing everyone.
 
Here is an early drawing of mine. I thought I had one with all the dims on it, but can not find it.

I did a little this way and that with it from this point. But you can see I was working towards small trail.

15330896170680.jpg
 
No real update today, other than I got lost a bit. I did try the reverse Triple Trees and liked how lined up and looked, but I would have to relocate foot pedal assembly and brake MC, so I will not be doing that.

What I drew on paper is not exactly what I am getting physically out in the garage with the trike. I have something wrong, maybe how I am finding angles, time will figure it out, I think it is how I am doing the rake angle, short on paper and yet longer in the garage?

Need to read things again, right down all the key points and tips that apply to this.

Wow, took a bit, but I got it figured out, the 47.5 degree angle is to be at the top of the neck, when I went from the ground line to get the 47.5 degree angle I actually shorted myself, so all was off, but it matching up now.
 
Last edited:
Never get in a rush to buy things, especially when you are doing a large project, best to take the time and double check what is needed is correct and shop around for the better price and product, maybe even ask for members input on it.

Okay, almost broke all those rules when I thought I needed a new 18" wheel setup, also ment going to disc brakes at a cost near 1K.

So damn as glad I did not do it........, turns out that I have a choice to make, spend near 1k on 18" front wheel assy., or use the 16" wheel with drum brake that is if all checks out true to keep using it.

Just a heads up, we owe it to ourselves to step back and look everything over a few times, once confirmed "good to go" get what is needed. Actually you can save time and money this way. Have a great week everyone:)
 
Yep.....gotta stay on the right side of the 90.

Easy mistake to make.

IF you are going to make a new front end then use whatever size tire suits your fancy.

You must have been stuck on that larger rim when trying to use the original fork.

Practical and what looks cool are not necessarily the same thing.

A shorter and wider tire with more contact patch. Even a flat tread tire. All will be more stable, more forgiving, more breaking potential.

A tall skinny just looks cool. It can be made to be an acceptable ride.

There is a reason why the big cruiser with 16 inch wheels and a fat tire are the popular thing to trike kit.

I went to a skinny 19 inch and it looks cool. But I can push it around more.

Pick what you want to do.
 
correct drawing

It is a good feeling when the drawing match's up with what is in the garage.

20180806_114700.jpg

The tires on the trike are old and weather worn at best, so I will need a new front tire and should get it mounted and on the rim before I get set on tube length or set on rocker arm length.

I have not completed the 18" rim drawing yet, but started it.

I can not find it now, but I read a chart (a guideline of rakes and wheel placement ) and it was for chopper's, so keep thinking " Chopperhandbook " but have not found it, anyways there was the 3 1/2" off set pivot to axle point with a 1 1/2" trail, like in my drawing, but I do believe it was for a 45 degree rake, and the next rake in the chart was 50 degrees. It was a guide to find the rocker arm length and pivot points with a specified rake. Once one has the pivot point location on the fork tube one can determine the tube length needed. Created by years of experience and data, at least that is what my mind remembers.

I will have to check again for it, but I remember the 3 1/2 to 1 1/2 configuration because that is how I got the idea of the 5" rocker arm length. Each rake angle gave a different configuration of figures for the wheel placement.

Now if we have to allow for expansion and compression of the shock/springs with the movement of the rocker arm, it is said that one should allow 32.5 degrees exp. and 32.5 for comp. for a total of 65 degree rocker arm swing area.

With that said, full expansion leads to a zero trail point and full compression would create a 3" trail, estimates made off the drawing, and I found a weight felt on the front end to rake ratio that was for choppers, not the same as a trike, but a estimate of 35% of the over all trike weight should be on my front end. Figure this out in lbs. and one gets a idea of what strength material is needed to be used so the new front end meets the need of the trike and one gets adequate braking power on the front wheel. I do like the bullet design to finish of the end of the fork tubes, and I seen them on Sugar Bears site if I remember correctly. A project for sure, even if you have someone else make them for you, but nothing good ever came easy.
 
It is a good feeling when the drawing match's up with what is in the garage.

View attachment 60014

The tires on the trike are old and weather worn at best, so I will need a new front tire and should get it mounted and on the rim before I get set on tube length or set on rocker arm length.

I have not completed the 18" rim drawing yet, but started it.

I can not find it now, but I read a chart (a guideline of rakes and wheel placement ) and it was for chopper's, so keep thinking " Chopperhandbook " but have not found it, anyways there was the 3 1/2" off set pivot to axle point with a 1 1/2" trail, like in my drawing, but I do believe it was for a 45 degree rake, and the next rake in the chart was 50 degrees. It was a guide to find the rocker arm length and pivot points with a specified rake. Once one has the pivot point location on the fork tube one can determine the tube length needed. Created by years of experience and data, at least that is what my mind remembers.

I will have to check again for it, but I remember the 3 1/2 to 1 1/2 configuration because that is how I got the idea of the 5" rocker arm length. Each rake angle gave a different configuration of figures for the wheel placement.

Now if we have to allow for expansion and compression of the shock/springs with the movement of the rocker arm, it is said that one should allow 32.5 degrees exp. and 32.5 for comp. for a total of 65 degree rocker arm swing area.

With that said, full expansion leads to a zero trail point and full compression would create a 3" trail, estimates made off the drawing, and I found a weight felt on the front end to rake ratio that was for choppers, not the same as a trike, but a estimate of 35% of the over all trike weight should be on my front end. Figure this out in lbs. and one gets a idea of what strength material is needed to be used so the new front end meets the need of the trike and one gets adequate braking power on the front wheel. I do like the bullet design to finish of the end of the fork tubes, and I seen them on Sugar Bears site if I remember correctly. A project for sure, even if you have someone else make them for you, but nothing good ever came easy.

drawing look good...

if you dont have access to a drawing program auto cad or master cam or similar i would be happy to draw that up ... makes it real simple to change any thing to see what it will do to the trail....

in case you didnt know the shorter the rockers are the more your trail will change
 
Download the free version of.

Draftsight

You can do all the 2d flats in that and also save it in a format that the machine shop can use.

For instance.... you save a rocker as a .dxf

Take the dxf file to the machine shop. And presto....a plasma, laser, or waterjet part without the engineering fees for drawing it in.
 
Good morning to everyone, well I have spent some time trying to get the drawing program to work for me. I have what was required to run it, but I think I lost patience with age, or like other programs a short course in how to use them is needed. Not giving up, just not making head way as fast as I wanted.Okay, tire size, wow, been going back and forth on what I should do, what is best for the trike.I remember on this 3speed bicycle I had, chopper it was called and had a little front wheel with lots of trail I am sure. It was great until high speeds down the step hill, front end would wobble uncontrollably. Usually a spill on the pavement followed.So does the design of the drop pivot with a tighter trail eliminate this with a small tire ? or does it still happen?Finding a 18 x 2.5" Harley rim has not been easy on ebay. 19" rim size seems what stock was on a lot of them, but can not go past 12 1/2" axle height. Okay seems house is up, need to take care of things.
 
If you are making the front end.....then you can make any tire diameter work. You will have to re-work the math.

19 front tires are very common.

I have a 90/90-19 on mine.

Have you looked at bike rear wheels? The wheel dont know any difference front or rear.
 
Correction, I do not want to exceed the 12 1/2" front axle height. I would like the same rolling diameter on all 3 tires if possible, and I have gotten it real close to that now.2004 Triumph Thruxton 900cc 18 x 2.5 " steel spoked rim that should be here today. It will mean going to a disc brake on the front end, so more work for that and $.Tire size, getting that all figured out and ran into a issue, could be me.Rear are radial tires, on the front was a Metzeler tire which is bias ply type. Tire shop said it is okay to run tires like that on a trike, hummmmmOkay I always was told to run all radial or all bias ply on the car, yes it is different than the trike, but does this rule apply to trikes and bikes ?????Does one run radial on the rear and bias ply on the front, or do we want radial tires all the way around, or just bias ply ??????Just want to confirm info here, tires are not cheap and I do not want to make a mistake again. Guess I over did the thickness of my extension piece and welding things together will be a bit tricky I was told, but doable.Thank you everyone for the input and help that has been given, it kept me from giving up to getting things done and still have my trike, Happy Camper for sure.
 
I dont think it will matter much, the tires are so different anyway.

I would be more concerned with a good tread pattern at the point of contact. Not to worried about a very round section profile as it wont lean much.
 

Welcome to the Trike Talk Community

Join our vibrant online community dedicated to all things Trikes! Whether you're a seasoned rider or just starting out, this is the place to share experiences, tips, and stories about your three-wheeled adventures. Explore modifications, maintenance advice, and rides, all while connecting with fellow trike enthusiasts from around the globe

Forum statistics

Threads
55,452
Messages
805,700
Members
24,006
Latest member
Stitch61
Back
Top Bottom