What did you do to Your Tri-Glide Today?

Had the 12" KST Mayhem Bagger handlebars and some new grips installed. Only have 1000 miles of riding on my trike but knew I had to change out the stock bars to something higher to help with the back ache between the shoulder blades I was getting when riding for a few hours. I like the way they flow with the batwing lines and sure help with a much more upright posture for riding. One of our local HD dealers is running a $99 per hour labor and 20% off parts to get business so helped them out by getting the bars changed out and new grips. They have to cut off the left grip so a replacement is needed. Usually they have some stock grips laying around and just give you one and in many cases the bike owner doesn't know that the grip has been changed out with another stock grip. I like the new grips, simple lines and have black and chrome look (polished aluminum) to go with the looks of the trike. I followed add pictures instructions and they came out sideways so I'm missing something.

View attachment 85689

View attachment 85690
Congratulations you will absolutely love the higher bars. All back and shoulder aches are going to be a thing of the past. Those also look a little wider than OEM, that will help with leverage Good Job... :good:Stay Safe, Stay Home and Stay Healthy Fred
 
Ok, just ordered 2” tank lift with deluxe option and cooling deflector wings for my birthday present to myself, which is tomorrow, can’t wait to get. Next on the list is the 606 air cleaner and external breather kit.
Like wise on the Happy Birthday and pray you have many, many more ... Stay safe Stay home and stay healthy.:good:Fred/Jeanne
 
Changed Sheepskin Seat Cover, Switched PV Gauge Setup, DK Custom Passenger Floorboard Relocators and got a short ride through local country back roads. If interested, photos are in this thread.
 
Great Weather Day!

Got a 103 mile ride in early this morning. The weather was so nice in the afternoon, I went back out and rode another 84 miles. A total of 187 miles on what had to be the best riding day this year:cool:. Given the number of other riders I saw, they were out there enjoying the fine weather too.
 
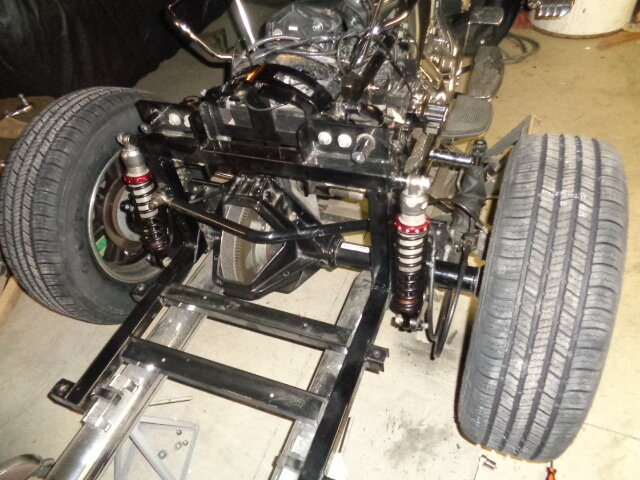
Pro Action shock install

One of the first (and best) things I did to my 2018 TG was to install DK's 14" Pro Action shocks with Convertible Lift Kit. When I traded for my 2020 they were of course removed - not going to let something that sweet go with the trade in for sure. But I was hoping the new hydraulic adjustable rear shocks introduced on the 2019 model year would be so superior to the old style air shocks H-D has been using for years that I wouldn't need the Pro Actions and might sell them. And let's be frank - it is quite a PIA to change out shocks and that's another reason I was hoping against hope the new style stock shocks would be acceptable. But au contraire they simply are not. So yesterday I began the project.

Now when I did the install on my 2018 I did it with the body on the trike. Tricky but doable. But the new style shocks have hydraulic lines running from the adjuster to each shock and I thought (and knew) it would be a lot easier if I removed the body. I know Kevin and Devin have removed the new style shocks with the body on but heck I think they both are trained in Braille since there is no way to see wtf you're doing on the top end.

IMG_0284 by Jerry Rice, on Flickr

My Tahitian princess with her skirt removed. Mama and I lifted it off with no problem. Well she did get a bit red faced from the exertion but it gave her complexion a nice glow.

IMG_0285 by Jerry Rice, on Flickr

The new style shocks have this adjuster in the cavity right behind the rear of the seat. Yeah you gotta remove the seat to get to the adjuster - just another reason these had to go.

IMG_0286 by Jerry Rice, on Flickr

I unbolted the adjuster from its mount and pulled to to the rear.

IMG_0287 by Jerry Rice, on Flickr

IMG_0290 by Jerry Rice, on Flickr

The shocks removed. Ready to be packaged up for long term storage.

IMG_0291 by Jerry Rice, on Flickr

Pro Actions installed.

IMG_0288 by Jerry Rice, on Flickr

No problem with the swing arm contacting the Z pipe. Plenty of room. I did use the secondary mounting holes on the lift kit mounting blocks since the higher one has been know to cause problems with the exhaust on the M8 motor equipped TGs. No problem as was plenty high enough with the stock mounting blocks.

IMG_0293 by Jerry Rice, on Flickr

Now this little set of thread chasers made the install much easier. Wish I'd had them when I installed my footboard extensions. You know that white thread locker H-D likes to use on critical fasteners? Well it is difficult if not impossible to remove from bolts / screws and especially from the threaded bosses the bolts / screws attach to. These thread chasers clean that up very nicely and make for a quick neat re-installation without having to wonder if you've cross threaded a fastener because it is so difficult to turn due to the residual thread locker. Got this a couple days ago on Amazon: https://www.amazon.com/gp/product/B07N1XHPKW/ref=ppx_yo_dt_b_asin_title_o01_s00?ie=UTF8&psc=1

After I got it all buttoned up today I of course went for a ride to evaluate my new suspension. And the verdict is - it is soooooooo much better than stock it is like night and day. Now don't get me wrong because your TG will never, ever ride like your Lincoln, Cadillac, Mercedes, Lexus or my new Audi Q5. Ain't gonna happen with this solid axle beast. But it is so much improved it is hard to believe. I am happy, happy, happy I decided to do the install.

If you're considering getting a set of the 14" Pro Action shocks do your self a favor and just do it. You won't regret it. And I'm not affiliated with Pro Action or DK except for the fact that I've gotten to know Kevin and Devin and fully support and appreciate their efforts and great products.
 
Great Job!

Jerry, Nice work, great write-up and photos!

One question, did you remove the tour pak from the trunk, or just lifted the trunk with it attached? Sort of wondering if there's any weight lifting benefit to taking the extra time needed to remove the tour pack first?
 
Jerry, Nice work, great write-up and photos!

One question, did you remove the tour pak from the trunk, or just lifted the trunk with it attached? Sort of wondering if there's any weight lifting benefit to taking the extra time needed to remove the tour pack first?

Definitely remove the tour-pak before removing the body. That sucker is heavy. Don't know what the body weighs but I'd guess maybe 70 or 80 pounds. Really was no problem removing it but on the re-install I got my daughter to come over and help. She lifted from the back while my wife and I were on the sides because it took a bit more time in the air to make sure it was properly positioned before lowering it onto the chassis. Two men could do it no problem but I didn't want to challenge my wife with that much of a task.
 
Definitely remove the tour-pak before removing the body. That sucker is heavy. Don't know what the body weighs but I'd guess maybe 70 or 80 pounds. Really was no problem removing it but on the re-install I got my daughter to come over and help. She lifted from the back while my wife and I were on the sides because it took a bit more time in the air to make sure it was properly positioned before lowering it onto the chassis. Two men could do it no problem but I didn't want to challenge my wife with that much of a task.

Thanks!!

Yea, I singlehandedly removed & installed it when I added the DK Custom Tour-Pak Filler LED Light. So, if I need to do it again, I will be sure to at least get another set of hands!!
 
  1. nice pictures easy to work on with the body off good work Fred

For sure Fred. Don't think I could have done it with the body on. Actually it was quite a bit easier removing and reinstalling the body than I thought. I'd build up a huge negative in my mind but thankfully it really wasn't bad at all. And as you said much easier to deal with the shock replacement with the body off.


For sure Fred. Don't think I could have done it with the body on. Actually it was quite a bit easier removing and reinstalling the body than I thought. I'd build up a huge negative in my mind but thankfully it really wasn't bad at all. And as you said much easier to deal with the shock replacement with the body off.
I wish you would have mentioned you were going to do it. By chance did you look at the alignment of the belt in reference to the front pulley? Just curious mine was poorly aligned but it is almost a Dinosaur. It would have been a great time to dab a little sticky Grease on the Pan Hard Rod ends. Just little things to look for even though it's New while you have the body off. You were saying it was a good lift to get it off, you're right... it's easier with the wheels off you don't have to lift as high. I've said before removing the body is no big deal and it makes access to anything under there so easy. Again great job those shocks are a great upgrade until you ride with them' you never know how poorly they ride before. Stay safe, Stay Healthy Fred/Jeanne DSC01563.JPG
 
I wish you would have mentioned you were going to do it. By chance did you look at the alignment of the belt in reference to the front pulley? Just curious mine was poorly aligned but it is almost a Dinosaur. It would have been a great time to dab a little sticky Grease on the Pan Hard Rod ends. Just little things to look for even though it's New while you have the body off. You were saying it was a good lift to get it off, you're right... it's easier with the wheels off you don't have to lift as high. I've said before removing the body is no big deal and it makes access to anything under there so easy. Again great job those shocks are a great upgrade until you ride with them' you never know how poorly they ride before. Stay safe, Stay Healthy Fred/Jeanne View attachment 86175

You are right about not knowing how poor the stock shocks are until you've had better. Reminds me of the old song 'them that don't know they don't know they don't know'. Once you've had them there is no gong back to stock. Just sayin'.
 
Fuzz it's simple

Ground time is not more than twice and only ten minutes on you're back. No need to get on the ground if you don't have a bumper but just about everyone does. Use a 1/2 deep well to remove bumper these are the same bolts in side to be removed. Empty trunk and tour pak take out the liner in the trunk. Jack trike up as far as possible refer to scored Pro Action for Shiney thread LOL. I use a cycle jack placed as far back on the frame as possible, and a small trolley jack with a 12" 2X4 on it under the trunk on the cross members as proscribed by Harley. Alternating I raise the trike starting with the cycle jack you get the drift it's simple and when I get it up as far as I want it. Then I place old trailer leveling jacks under the frame in the back. Next remove seat unplug all wiring and appropriate connections. There are six bolts inside the trunk four on the bottom and two up high on the front wall. The left side should be a ground strap it's a stud take nut off first and then remove stud and right side a cap screw. 1/2" socket does them all. Now on each side you will find Allen head bolt (no pun intended) remove them one on each side. LOL these are just above the passenger floorboards. The reason I jack it off the ground you can remove the wheels and it is so much easier to move the body off without doing any scratches etc... Two people can easily lift it off and back be sure you prepare a place to sit the body down. Do not sit it on mud flaps hanging down on the fenders are not to be stressed at ends of fenders ie (egg shells). Now you have the body off you can spend a day cleaning all the dirt and road crud that has built up over the years. And deep clean the back side of your wheels rattle can clear coat I did. Check drive belt alignment and Panhard Rod for rust streaks and looseness. With the body and wheels off the cycle jack almost balances what is left of the trike by it's self.

You should get directions on the shock Install I have the original shock brackets from Shiney but these are vintage lift one's as well. Good luck Fuzz it's so easy the old DOT Officer can still do it. :eek:mg: Fred
 
What Fred said . . . but I had the wheels still on when I removed the body and put it back on because I though having it on the jack stands would be higher than having it on the ground with the wheels on but maybe not.
smiley%20confused.gif


In any case I suggest removing the tour-pak first because it is pretty heavy itself and without it installed the body will be much easier to deal with. The most difficult part of dealing with the body was the two upper screws inside the body. They were a bit difficult to reach and deal with but other than those it was no problem at all.

Now DK says the 14" Pro Action shocks take a different Convertible Lift Kit than the one they have for the stock 13" shocks so verify that with them. Kevin told me installing the 14" with the stock or 'standard' convertible lift kit won't work satisfactorily so just purchase the package of shocks and lift kit as per their website and you'll be fine.
 
Fuzzy

I had the comfort lifts installed on my trike from a couple years ago and when I order my shocks form DK was told that the 14" shocks would not fit, so I had to order the 13" shocks. It took me about 2 hours to install my shocks without removing the body. Hardest part was removing the top bolt. Ratchet wrenches made it a lot faster and easier.
 
Well off work and can't take it

I just ordered fork upgrade springs and valving for the forks on old Shiney so another DIY photos will be coming up. The Pro Action rear shocks are so nice I am going to complete the job. I have never taken the forks off before but I'm going to after all it's not Rocket science LOL...:Shrug: Wrench safe Fred
 
I just ordered fork upgrade springs and valving for the forks on old Shiney so another DIY photos will be coming up. The Pro Action rear shocks are so nice I am going to complete the job. I have never taken the forks off before but I'm going to after all it's not Rocket science LOL...:Shrug: Wrench safe Fred

It is not terribly difficult Fred . . . just a bit tedious. I helped a friend install Legend fork cartridges on his 2011 Road Glide a couple years ago. If the fork oil has been in there for quite a while be prepared for very unpleasant odor!
 
It is not terribly difficult Fred . . . just a bit tedious. I helped a friend install Legend fork cartridges on his 2011 Road Glide a couple years ago. If the fork oil has been in there for quite a while be prepared for very unpleasant odor!

To my knowledge it has never been changed, time to do something. I'm more concerned removing the lower Dash and popping the ignition switch last time it was a real task getting it back together. The rest is gathering up materials for holding the fork tube soft alloy angle metal of which I have none of at the moment. As far as Jacks, Vises and hand tools I have plenty. I may plan to line steel strap with leather so not to mark the tubes. Fred
 
To my knowledge it has never been changed, time to do something. I'm more concerned removing the lower Dash and popping the ignition switch last time it was a real task getting it back together. The rest is gathering up materials for holding the fork tube soft alloy angle metal of which I have none of at the moment. As far as Jacks, Vises and hand tools I have plenty. I may plan to line steel strap with leather so not to mark the tubes. Fred

I've pull the ignition switch on numerous bikes and trikes . . . my own and friends. One thing for sure to NOT do is to turn the handlebars to full lock left. After installing new handlebars on my 2018 TG I wanted to check full right and left to make sure cables and lines were not in a bind.

When I went full left even with the ignition switch removed the front fork locked. I had to take a screwdriver and shine a light down the hole to manipulate and realign the mechanism. Took several tries and I was sweating bullets wondering how I'd deal with it if I couldn't get things lined up. So be careful there.
 
this is a little strange but

To my knowledge it has never been changed, time to do something. I'm more concerned removing the lower Dash and popping the ignition switch last time it was a real task getting it back together. The rest is gathering up materials for holding the fork tube soft alloy angle metal of which I have none of at the moment. As far as Jacks, Vises and hand tools I have plenty. I may plan to line steel strap with leather so not to mark the tubes. Fred
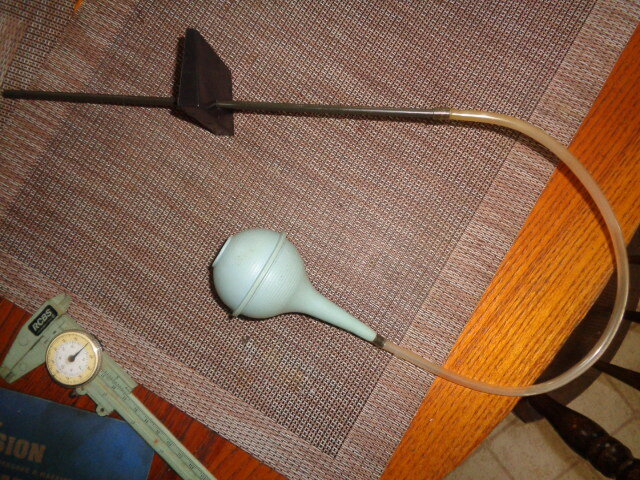
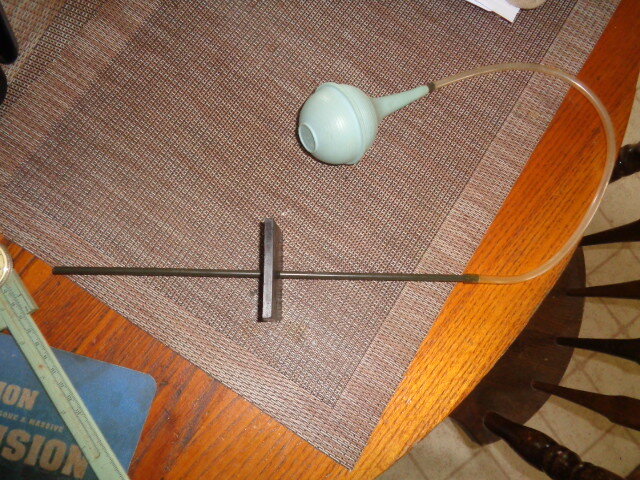
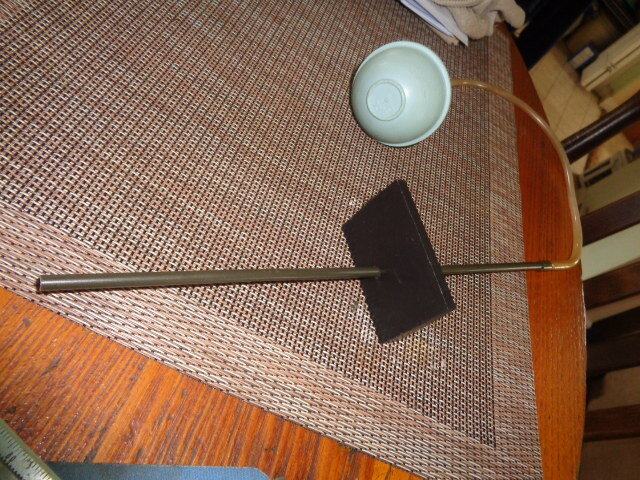
Realizing i need an oil volume gauge either i buy one or make one. The kit is not here so I made one I think it will work just fine.:D fred

DSC01637.JPGDSC01638.JPGDSC01639.JPG
 

Welcome to the Trike Talk Community

Join our vibrant online community dedicated to all things Trikes! Whether you're a seasoned rider or just starting out, this is the place to share experiences, tips, and stories about your three-wheeled adventures. Explore modifications, maintenance advice, and rides, all while connecting with fellow trike enthusiasts from around the globe

Forum statistics

Threads
55,374
Messages
804,528
Members
23,942
Latest member
nmbr1soonerfan
Back
Top Bottom