Roadstar

Dec 16, 2017
108
95
Chauvin, LA
Name
Hugh
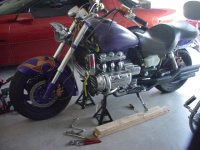
Working on my wife's Roadstar trike conversion. It will be pretty much the same as I did on my Stratoliner.

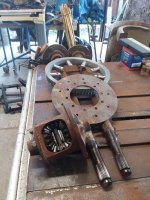
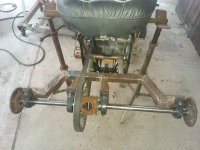
First picture shows the axles before cutting the hubs off, chunk, adapter plate for rear sprocket, and the rear sprocket. All drilled and ready to bolt together.

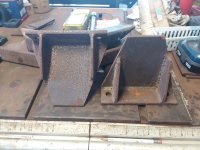
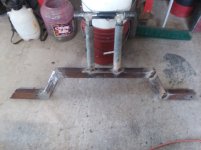
The second picture shows the two center bearing mounts.

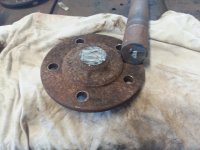
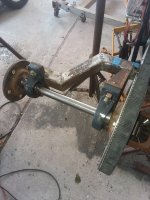
Third picture is the hub cut off of the axle.

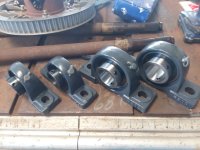
Last picture of the pillow block bearings. Two large ones for the center section and two small ones for the axle ends.
 

Attachments

  • Axles, Sprocket, Adapter and Chunk.jpg
    Axles, Sprocket, Adapter and Chunk.jpg
    176.7 KB · Views: 403
  • Center Bearing Brackets.jpg
    Center Bearing Brackets.jpg
    198.1 KB · Views: 382
  • Hub Cut off Axle.jpg
    Hub Cut off Axle.jpg
    148.8 KB · Views: 385
  • Pillow Bearings .jpg
    Pillow Bearings .jpg
    169.7 KB · Views: 376
Nice to see some one with the knowledge or guts to make a Road Star trike.

I gave up years ago trying to get my R* triked. Ended up getting a GW with Motor trike kit.

Still ride the bike every day to work and use the trike sparingly.

GWs are sooooooooooooooooo boring.
 
Progress

All of this garage trike build with my Stratoliner and now Karen's Roadstar began around three years ago when two friends bet me I couldn't build a functioning trike rear end under $500. It took about 9 months and I was under the $500, but did it. Of course by then one friend died and the other moved away. Some people will do anything to avoid buying me a soda!!!!! Now I'm building these due to my wife having MS and her legs just aren't strong enough to push the bike back or hold it up for long periods. Of course I blew out a bearing on my original design, went back to two wheels to keep riding, and now re-triking mine.

Today I cut the main rear end frame pieces and welded them together. Using an old table saw that the motor burned up in as a fabrication bench.Rear End Axle Frame.jpg
 
If I was 20 years younger I might have strength to try a build.

I did about 7 years ago bring a total POS Valkyrie back form the dead. Rebuilt it to 98% OEM with NOS parts.

Cost me a small fortune took a little less then a year to do. Couldn't get anyone to build me a metric trike. Again sold it for a big loss.

Today I cant work on anything for more then 30 minutes. Its all I have in me. So seeing what your doing is a pleasure.

I hope the build goes well for you and your wife enjoys the ride.
 

Attachments

  • DSC00494.JPG
    DSC00494.JPG
    149 KB · Views: 364
  • rebuilt 98% stock (1).JPG
    rebuilt 98% stock (1).JPG
    152.2 KB · Views: 364
Thank You

Believe me, I don't listen to my doctors nor my body for that matter. I push too hard and pay for it at the end of they day. I do love your bike!
 
Rear Brace

Welded he rear brace together along with the swing arm. Bit hard to see but the tubes have bolts in them which slide in slotted inner tubing for belt adjustment.
 

Attachments

  • Rear Axle Brace.jpg
    Rear Axle Brace.jpg
    253.8 KB · Views: 334
Axle End Bearings

Tacked the mounts on the frame for the axle end bearings and found he alignment tube I used on the Stratoliner. Tomorrow I hope to get the sprocket and chunk mounted. Figured since this is for my wife's bike, she wouldn't mind my using the flower pot toy soldiers Christmas decoration to hold the frame up!Axle End Bearings.jpg
 
Swing Arm

Fabricated a new swing arm and attached the axle frame with the four pillow block bearing to the bike. Welds look crappy as I flux core weld and haven't cleaned them up yet.Side View New Swing Arm 2.jpgSwing Arm and Axle Frame.jpg
 
Update

Finally made progress I can show. Three days of turning the axles (Ford rear axles) to a diameter to fit the pillow block bearings. Being case hardened and using a Harbor Freight 9x20 lathe was a very long tedious process. My poor lathe! :laugh:

The wheel hubs were cut off the axles, then drilled and turned to press fit on the axle. This keeps them centered and I can check for any wobble by spinning the axle with the lathe. Just need to weld them permanent. Next step is to go the the salvage yard for 5x5 disk brakes, calipers, and caliper supports along with a flex plate for the reverse.
 

Attachments

  • Both Axles.jpg
    Both Axles.jpg
    177.9 KB · Views: 240
  • Left Axle.jpg
    Left Axle.jpg
    233.7 KB · Views: 232
I did not like being slowed down. Body and mind just isn't what it used to be.

The strength just isn't there anymore. 30 years of being a type 1 diabetic.

But.

Great to see you progressing and with pics too.
 
On the Suspension

My wife's bike is sitting on the suspension. I have the rims blocked up close to where the actual wheels and rims will hold it. I need to lower the seat two more inches. This is one trike mod where there may be no going back to two wheels. I had to cut a piece of the frame off that hold the rear of the seat and now another two inches of those areas. Since the frame is steel I should be able to weld it back together but plans are never to do it.Sitting on the Suspension.jpg
 
Trial Fit

Put the body for MY trike on the Roadstar to get an idea of how I want to fit the new body I'll fabricate for it and attach the double seat. Had Karen sit on it and she loves the way it now feels with a larger seat.

Karen Trying Checking the Fit.jpg
 
Progress

The weather allowed me to finally begin glassing the body for my wife's Roadstar. First a layer of six ounce woven cloth, then three layers of two ounce fiberglass mat, a final layer of six ounce cloth, and all worked together with one gallon of polyester resin and lots of rolling. Going to get back on the axle assembly this weekend since rain is forecast.Center Body Glassed Up.jpg
 
Center Body and Frame

Fabricating the center body support. Only after I used my hydraulic tube bender to bend one spot a small amount, move the pipe and bend another section a small amount, and repeat many, many times to get the curve right, did I find out my father in law has a pipe roller. Now I know! I am adding the air shock mounts tomorrow and of course a design change. Instead of fiber-glassing a nice trunk under the center section, my wife wants me to mount a trunk from a Harley Davidson her dad gave her on the back. Now I have to figure out a way to blend it into the body, remain removable, and not look like I just stuck it on there......

Fitting Frame to Bike.jpgCompleted Frame.jpgFitting Seat and Body.jpg
 
Trunk

Got the frame welded up to hold the trunk. I sat on it (250 pounds) and it held nicely. So it should hold up to the little weight my wife puts in it. Now to fit the fiberglass body under it.

Rear Frame.jpgRear Frame 2.jpgRear Frame 3.jpg
 
First Fender

Fiberglassed the first fender. Once the two halves cured I glassed them together to from the completed fender. The white area is the rear section with extra chopped fiber to aid in deflecting the crap on Louisiana highways.

First Fender Halves.jpgFirst Fender Together.jpg
 
Progress

Been working on the Stratoliner mostly so my wife can start riding again. But I have been sneaking work on the RoadStar. I had to redesign the rear frame a bit since the fenders sat lower than the center section. Karen wants to have a passenger seat and trunk which throws a wrench in the original design I had in mind, but is still workable. I need to fiberglass the fenders to the center section, glass some fairings from the center section to the trunk, weld mounting points for the body, finish the brakes, etc, etc. But with warmer weather I should be able to push forward. Also seems like fender skirts are agreed upon.... Now I need to fiberglass a front fender that's longer than stock so skirts can be added there too.

Fiberglass Fitting 1.jpgFiberglass Fitting 2.jpgFender Skirt Look.jpg
 
Brakes

Well I decided to add brakes to the rear axle for my wife. Might even run brake lines to the too!:D Bolted the brake disk in place, put a thin spacer in the caliper to get clearance between it and the disk, and then shimmed the caliper where the disk was centered in it. Made cardboard templates for the two pieces needed, cut them out of 3/8" high carbon steel, grinding and sanding to fit, then welded them in place. Still need a bit of cleaning up but I did get the right caliper mounted. Just don't understand why my pictures come out sideways, but what the heck.....

Right Brake Bracket.jpgRight Brake Assembly.jpg
 
That's great information since I want to rake her bike a bit come December.

After putting the kit together, I did not rake it. After a long twisties trip, I was sitting in my easy chair thinking I was having a heart attack with severe pains in my chest. A little probing found the source of the pain. Chest muscles were overworked. Ordered a 5º tree the next day.:D
 
Progress

Turned some buttons and washers to bolt the body to the frame. After welding them to the body supports I can now bolt the body on. The image shows how everything bolts together. I have 3.5" clearance between the tire and inside of the fender which should allow for the horrible roads in Louisiana.

Butons & Washers for Bolting Body on.jpgBody Bolted to Rear Frame.jpgBody Test Fit to Frame.jpg
 
Progress

Did lots of grinding and sanding on the rear frame. During a break from it, I welded some pins together to hold the air shocks in place. While I don't ever want the belt to break on the road, I figured just puling a clip and sliding the pin out is not only easier, but fewer tools to carry along.

Shock Pins.jpg
 

Welcome to the Trike Talk Community

Join our vibrant online community dedicated to all things Trikes! Whether you're a seasoned rider or just starting out, this is the place to share experiences, tips, and stories about your three-wheeled adventures. Explore modifications, maintenance advice, and rides, all while connecting with fellow trike enthusiasts from around the globe

Forum statistics

Threads
55,374
Messages
804,525
Members
23,942
Latest member
nmbr1soonerfan
Back
Top Bottom