Navigation
Install the app
How to install the app on iOS
Follow along with the video below to see how to install our site as a web app on your home screen.
Note: This feature may not be available in some browsers.
More options
You are using an out of date browser. It may not display this or other websites correctly.
You should upgrade or use an alternative browser.
You should upgrade or use an alternative browser.
Need VW type3 DP 1600 heads
- Thread starter M3T
- Start date
- Thread starter
- #34
An adventure it is!!!!
Omg where to begin
 BTW Bug Formance closed it's doors in 2017....
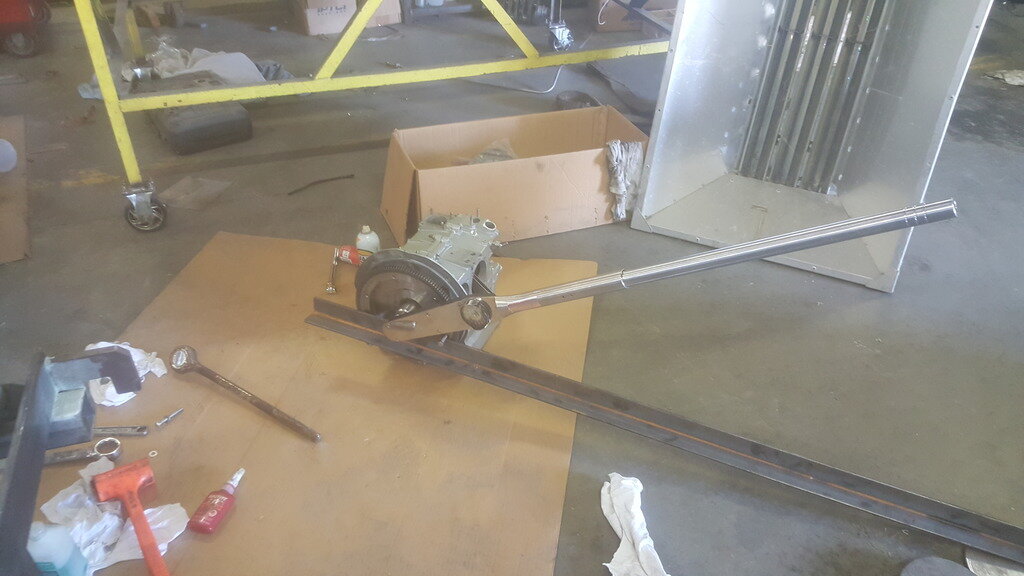
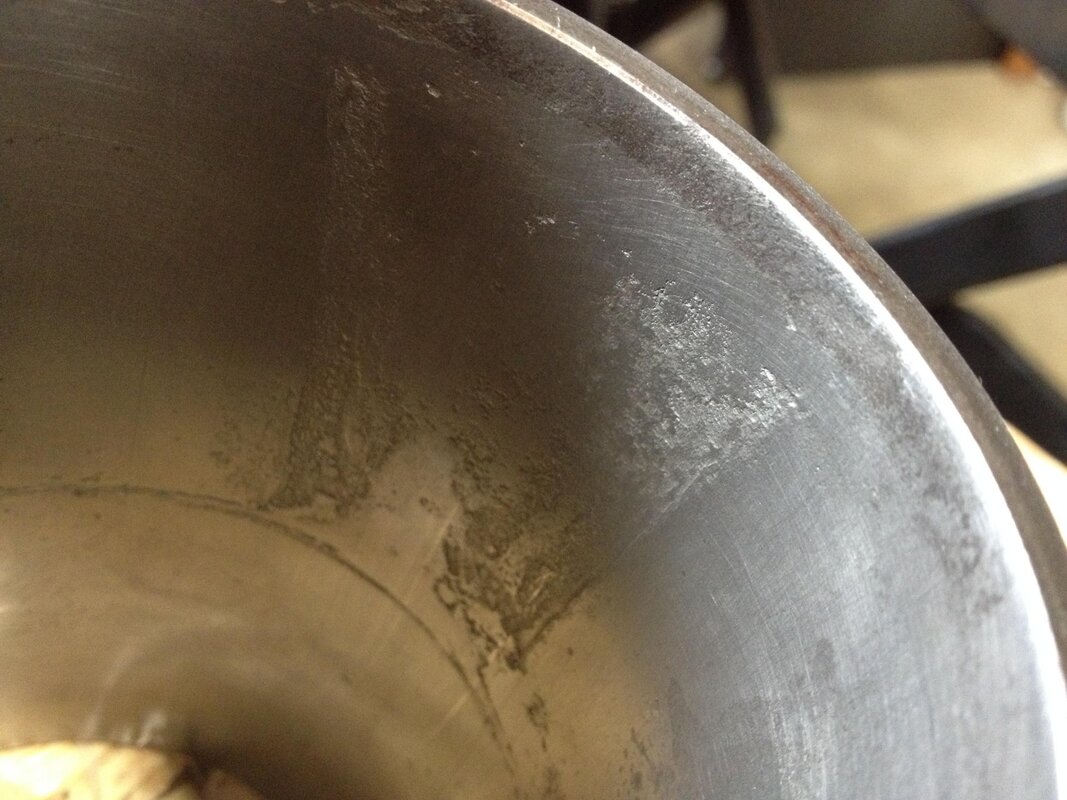
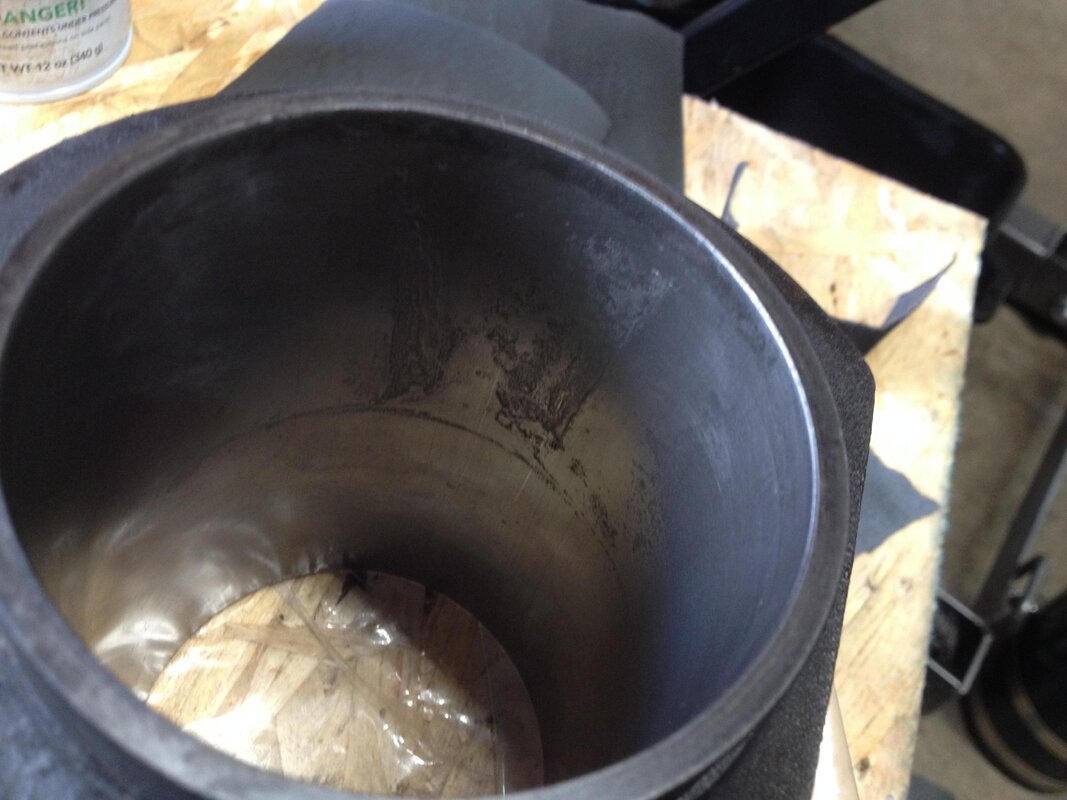
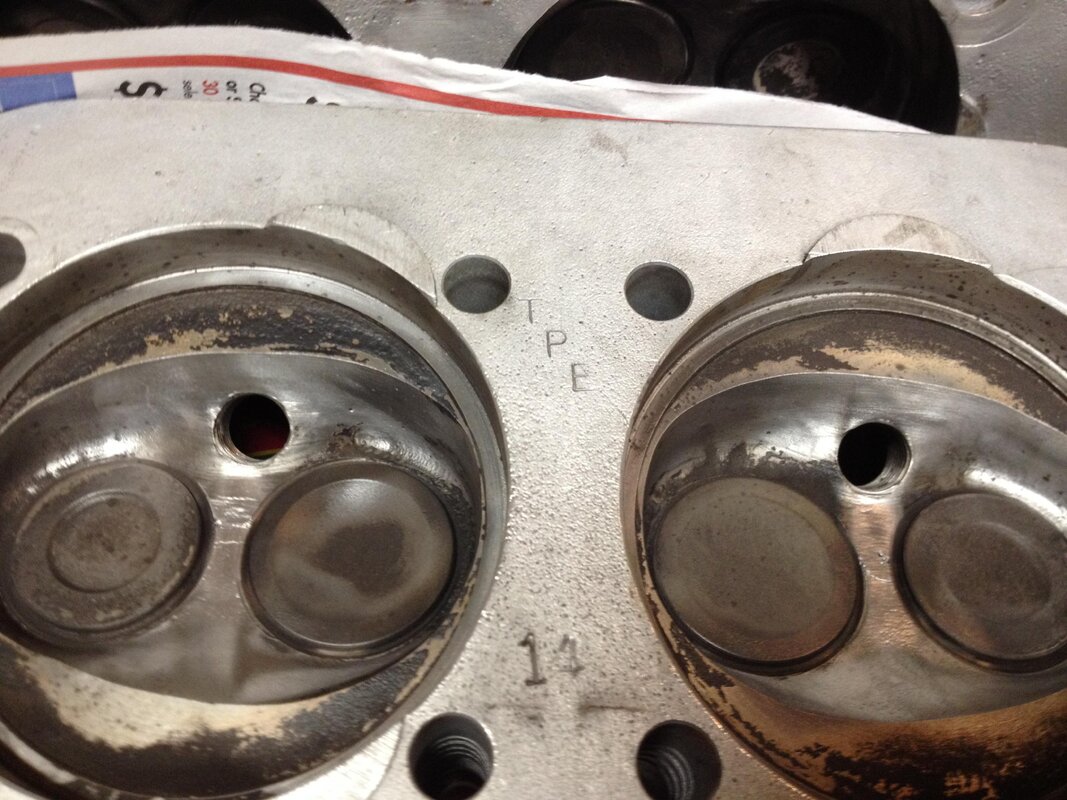
So I put a little red loctite on that stud that came out on number 3 and it held and torqued just fine. So it turns out I have two cylinders that could be replaced as there is pitting and it's too deep to hone, so I kinda closed one eye, lubed it up real good and put it back together I know it will need dealing with later. Then while cleaning up one of the used heads I bought I discover cracking between the valves;((( The shop I bought them from All German in Mtn. View said if they are little you can just ignore them however they did swap me for another head without cracks
 So I get it all cleaned up and start putting it back and then I discover a "Softy" As was suggested and I did not understand, I should have tried torquing the cylinder bolts before removing as I'm almost done tightening the second head and the bottom stud all the way to the left #2 goes soft on me and I could see the threads pulling out of the block as I would tighten or try to tighten the nut....stop laughing
 )). So then I called the local VW shop: Peninsula Auto in Campbell CA. These guys are the kind... Dave says take out the stud and bring it down which I did and he had what he called a "Super Stud"
 )))) which has like a woodscrew thread with a sort of a half moon cut out to catch the chips as it cuts a new thread and low and behold it worked and I did not have to take it all apart to move forward
 ))) I know it's not a permanent fix but I do think that is very clever.... So finally the heads are installed and I was able to adjust the valves. Next I need to rebuild the carbs, install and re install the engine back in the frame. I also need to connect at least some kind of oil pressure gauge, will probably go to Peninsula for that before I try to start it. Prior to that I'll refill the oil and take a compression test to see what's what...... Here is a pic of the super stud.. and thru all this, I also found the wires were not in correct position on the dist. cap... I'll keep you posted.... Happy New Year!!!
View attachment 53228
damaged cylinders
Cracking head...
Omg
So I put a little red loctite on that stud that came out on number 3 and it held and torqued just fine. So it turns out I have two cylinders that could be replaced as there is pitting and it's too deep to hone, so I kinda closed one eye, lubed it up real good and put it back together
View attachment 53228
damaged cylinders


Cracking head...

vwbug72501
700+ Posts
Good to know "Super Studs" are still available. They have been life savers in the post for the older non case-saver cases. You will need to have Case-Savers installed when and if you rebuild your cases in the future.
The engine sat outside where water could get in it at some time in its life. That's why the cylinders were corroded on the bottoms of the bores. You probably could have chased down a couple of used jugs locally for cheap and the rings would have sealed better. What you've got will run but will probably smoke at start up and use oil. Also make sure you have a good crankcase vent as you will experience some blow-by.
You're probably correct about the PO slapping the engine together to get it sold.
Keep trudging on:ahhh::ahhh::ahhh::ahhh:
- Thread starter
- #36
Cold compression test results...
I know the book says check it with a warm engine, however I'm not ready to start it yet and I saw some guy on youtube check it on a cold motor.
#1: 85 #2: 90 | #3: 85 #4: 80.
I'm surprised to see the numbers this high considering the used condition observed.
#4 is the one the pushrod was disconnected and the cylinder wall in the poorest condition. I'll post the warm compression numbers when I get them....
Happy Thursday!!!
- Thread starter
- #37
I think my carbs are running a little on the hot side...
I'm gonna try and paste some links to video's I took at initial startup here after re assembling so could take a hot compression test... suggest watching in order https://drive.google.com/file/d/18R7M4XOT8sXBulXjJylxyW5G1JUkC2X3/view?usp=sharing
https://drive.google.com/file/d/1TCcxhOHEqhBfecDpGpI5atnfhylLuwxe/view?usp=sharing
https://drive.google.com/file/d/1Hk8NQZ-9SQjTAJqL17NAmWKTfd8_nr6g/view?usp=sharing
https://drive.google.com/file/d/1CeyxeSQLuZ_1QAMVKo7umjR82iw_L0EA/view?usp=sharing
Just had to post these Was able to get the readings:
#1 100 #2 118 #3 105 and #4 90. Oil pressure mostly reading about 35lbs however once it got really warm dropped to around 20.
Had trouble with my rebuilt carbs with the float's sticking so after many squirts of seafoam and starting fluid, adjusting the timing, it's getting closer to road worthy although far from optimal......
Happy Holiday!!!!
I'm gonna try and paste some links to video's I took at initial startup here after re assembling so could take a hot compression test... suggest watching in order
https://drive.google.com/file/d/1TCcxhOHEqhBfecDpGpI5atnfhylLuwxe/view?usp=sharing
https://drive.google.com/file/d/1Hk8NQZ-9SQjTAJqL17NAmWKTfd8_nr6g/view?usp=sharing
https://drive.google.com/file/d/1CeyxeSQLuZ_1QAMVKo7umjR82iw_L0EA/view?usp=sharing
Just had to post these
#1 100 #2 118 #3 105 and #4 90. Oil pressure mostly reading about 35lbs however once it got really warm dropped to around 20.
Had trouble with my rebuilt carbs with the float's sticking so after many squirts of seafoam and starting fluid, adjusting the timing, it's getting closer to road worthy although far from optimal......
Happy Holiday!!!!
- Thread starter
- #38
On The Road Again....
Yes!!! Yesterday I took her up to 70 on the fwy and everything seemed fine. I believe I need to replace my Carb's. (Solex Brosol 32/34 PDSI) as there is play in the throttle shafts and thus it will not idle correctly. When I come to a stop it will race for a while then if I just ignore it eventually it will die, however if I give it a little throttle it's mostly manageable. I've now changed the oil again after only a couple hours of running and it was black as night.... Changed tranny fluid, same thing very black. Lubbed up the shift linkage but still rather hard to change gears however seems to be getting better with use.
Luckly I went for a short ride as when I pulled in my driveway it was out of gas
I'm now waiting for a replacement petcock for my front gas tank as the first one did not really shut off, and a replacement Tach as it did not work correctly either..... Also ordered "The Bently Manual" and am researching for an extended speedo cable. I did manage to install the Speedo gear on my front wheel after removing the disk brake rotor to file a notch in it for the speedo gear tang to fit into....
Thank you all again for your tremendous help and insight with this project. I'm still needing a bit more drive time to decide if this will be a keeper for me....
Trike On!!!!
- Thread starter
- #39
Pilot shaft movement?
I forgot to mention when I first tried to separate the engine and trans it seems the pilot shaft was sliding out and thus it seemed like I needed more room as I was planing to lift the motor out of the frame. I didn't know that was happening so I re mounted the engine and had to take my rear frame apart so I could lower the engine out but when I did get it apart I discovered the pilot shaft would slide out a few inches? Is that normal? when it seemed like it was loose of any splines inside it would bump up against something so I did not try to remove it, and it seemed to go back in just fine.....
Anyone else run into this?
vwbug72501
700+ Posts
pilot shaft movement
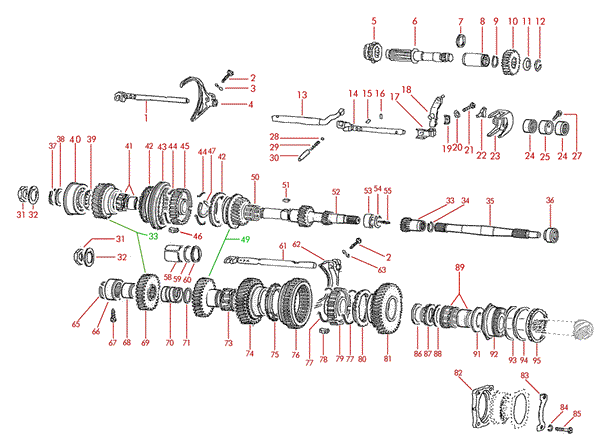
Circlip #34 has come off. This is not unusual in older transaxles. The reverse gear (#33) is captive in the case. You can run it with the clip off. Just be careful not to rotate anything in the trans axle if the input shaft is pulled out! Once the engine is installed it is captive and can't go anywhere. Just plan on replacing the clip if and when you rebuild/refurb the trans.
Enjoy your trike and welcome to the VW trike family!!!:goodjob:
- Thread starter
- #41
Really really enjoying this thing!!!!
Hi Trikers!!! Just posting a little update on my Trike. Well "The Piggy/Bug" now has a Super Stud on both sides as once I got it running and started driving it around at about 125 miles I had the impression I should re check the valve clearance as I was starting to hear more valve ticking sound on the side where the first SS had been installed. Of course I found it was loose;( and had a heck of a time getting it back tightened up to the proper torque however did succeed. Then on the driver side another stud would not tighten thus had to go hunt down another SS. This one was REALLY hard to get in there, having to use a breaker bar and all my strength to get it in there... Of course I found I had put a spark plug in crooked thanks to those dang tin's but was able to repair the thread with a thread chaser I bought at Auto Zone. My Solex carbs were acting up and even though I had attempted to rebuild them with really lousy documentation the pass side was not injecting gas when the throttle was applied so I found a CL add for some empi type 3 carbs and I went and bought them, even saw the guy remove them from a type 3 motor in his sand buggy. I swapped them in however they were way to tall to fit under my engine cover and started to research if I really had the type 3 kit and of course you know it was really a type 1 kit;( Argh... Will need to re sell them... They are brand new!!! I don't think the prior owner ever ran them and so I did fire it up and man it sounded really good!!! In the process of my research I spoke with Gary at CIP1 I think it's called. He was a type 3 and solex guru and told me about the Injection tube in my solex carbs, so back I want to the solex's and I could not pull that tube out no matter how I tried so I took it to a carb rebuilder and even they could not get it out without fear of breaking it;( So now being a little more edumacated I went back home and using a hammer and a really small chisel I was able to get the tube out
 Then I could not get it to clear on the nozzle end and using a very small pin and holding it with needle nose pliers I managed to break off the pin in the nozzle;((((((((((((((((( I remember the tech at the carb rebuilder saying you can probably find a new injector tube online so I looked and sure enough there were some but they did not look quite the same and I'd have to wait a week for it so I decided to try and drill mine out which I thought was really amazing considering how small it is and that little hole where the pin broke off was not in the center of the tube. After clearing it I re installed and though it does not run perfect it's running VERY well now and I even drove it up one of the steepest local hills in my area yesterday!!! It was a blast!!! It now has 217 miles on the odometer and the next thing I need to find is a seat that will accommodate a driver back rest
 After I repaint the HD batwing fairing I installed I'll post a new picture. Thanks again for all the very useful tips you've provided I now feel very committed to this thing and just having a ball with it
 )))))))))))))))
Hi Trikers!!! Just posting a little update on my Trike. Well "The Piggy/Bug" now has a Super Stud on both sides as once I got it running and started driving it around at about 125 miles I had the impression I should re check the valve clearance as I was starting to hear more valve ticking sound on the side where the first SS had been installed. Of course I found it was loose;( and had a heck of a time getting it back tightened up to the proper torque however did succeed. Then on the driver side another stud would not tighten thus had to go hunt down another SS. This one was REALLY hard to get in there, having to use a breaker bar and all my strength to get it in there... Of course I found I had put a spark plug in crooked thanks to those dang tin's but was able to repair the thread with a thread chaser I bought at Auto Zone. My Solex carbs were acting up and even though I had attempted to rebuild them with really lousy documentation the pass side was not injecting gas when the throttle was applied so I found a CL add for some empi type 3 carbs and I went and bought them, even saw the guy remove them from a type 3 motor in his sand buggy. I swapped them in however they were way to tall to fit under my engine cover and started to research if I really had the type 3 kit and of course you know it was really a type 1 kit;( Argh... Will need to re sell them... They are brand new!!! I don't think the prior owner ever ran them and so I did fire it up and man it sounded really good!!! In the process of my research I spoke with Gary at CIP1 I think it's called. He was a type 3 and solex guru and told me about the Injection tube in my solex carbs, so back I want to the solex's and I could not pull that tube out no matter how I tried so I took it to a carb rebuilder and even they could not get it out without fear of breaking it;( So now being a little more edumacated
- Thread starter
- #43
PiggyBug update
Thank you so much Fuzzy!!! Well she has 1,162 miles on it now. Starts right up, does not use oil or smoke, can get up to almost 80mph (does take a while to get there) and has not left me stranded )) Since this video I've installed a wind screen and a diff. Seat (mustang) will have to find a pic for you but until then here is a video that happened between my last posting and today. I had just completed building a wiring harness / schematic, etc... I'm amazed to see it's been nearly a year since my last posting. When I go down the freeway there is almost no wind noise in my helmet unlike any motorcycle I've ever had!!!! Still loving it!!!!!
M3T
https://drive.google.com/file/d/12GO4ihkxEoYxv_ciITcPJdWqYml0nLfM/view?usp=sharing
Hope this link works
Thank you so much Fuzzy!!! Well she has 1,162 miles on it now. Starts right up, does not use oil or smoke, can get up to almost 80mph (does take a while to get there) and has not left me stranded
M3T
https://drive.google.com/file/d/12GO4ihkxEoYxv_ciITcPJdWqYml0nLfM/view?usp=sharing
Hope this link works
Similar threads
- Replies
- 6
- Views
- 1,910
- Replies
- 16
- Views
- 14,572

