"C" CLAMP USE

keikat2

90+ Posts
Jun 9, 2018
95
52
Forney, Texas, USA
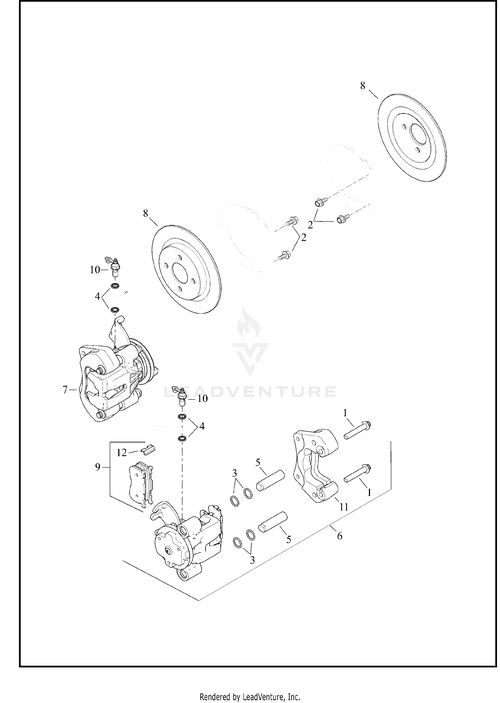
On my 2014 Tri-Glide, I am having a difficult time getting the left rear wheel caliper piston to recess and seat inside its caliper housing. As mentioned to me in an earlier inquiry, I do not see two (2) holes or indentions in the piston's front facing surface area, so I don't think the piston has to be first turned "clock-wise" to recess into the caliper housing. In turn, as a possibility, I am considering the use of a "C" clamp to recess and seat the rear caliper piston. Has anyone used a "C" clamp to recess/seat the rear wheel caliper piston(s) when replacing their Trike's disc rotor(s) and brake pads or is the use of a "C" clamp a definite "NO-NO". I would appreciate and look forward to receiving your responses. Thank you, Allen S.
 
I have used a large channel lock pliers as well as a c clamp

put 1 old pad against the piston to push against, and a small block of wood @ the back side of the caliper if you are concerned about scratches
 
I have used a large channel lock pliers as well as a c clamp

put 1 old pad against the piston to push against, and a small block of wood @ the back side of the caliper if you are concerned about scratches

Yep.. i’ve done it that way many of time👍… but another hint to make it easier to push them back take the cover off of the brake reservoir. Make sure you have some rags around it when you push the pistons back in some fluid might come up but that’ll take the pressure off the pistons..
 
Jack,

At this point (Trike raised, new disc rotor/new brake pads installed), would any additional "slackening" of the emergency brake cable help?

Also, I am assuming some Harley caliper pistons have the two (2) small holes/indentions and some do not. I cannot find "piston holes/indentions" or "turning piston clockwise" mentioned in the 2014 Trike Service Supplement manual. I have looked for Internet pictures of these type of caliper pistons. The only pictures I have found of a caliper piston (IE: car, motorcycle, etc...) having two indentions (not round holes), the two (2) indentions are cut in a rectangular shape on the outside edges of the piston directly across from each other. Is this what I should be looking for? Also, will the caliper piston recess all the way back into the caliper housing creating a flat surface area inside the caliper housing?

I am a little hesitant (as mentioned by my brother-in law) about using a "C" clamp. Is it possible the "C" clamp, with used brake pad covering the piston, could damage the caliper piston or some other part if too much pressure is applied to the piston?

I will be looking forward to your response.

Thank you,

Allen S.
 
More slack on the e brake will help, if you use an old pad against the piston you will be OK, it will push equally on the piston, you should not have to use brute force to push the piston in, if it does not move we need to find out why

If your pistons are totally flat faced with no indents 180 degrees from each other the pistons should push in provided the E brake actuator is not binding, you can check that by trying to move it forward and back, does the piston move in and back out easy

Keep in mind the piston does not have to travel far in to be seated, you should be able to tell by how much force you are applying also by the look of the piston and outer boot

When using a C clamp make sure the back side does not come in contact with the parking brake actuator, protect it

I am confused by the first part of your post, do you in fact already have the new pads installed with the rotors?
 
# 7 is your caliper? You see the bellcrank where the E Brake cable attaches, that must move freely for the piston to move in, slacken the cable, you should see the crank move opposite direction to take the tension off the piston, you can check this by tugging on the cable @ the bell crank it should move the lever

Medium
 
Jack,

Yes, I removed the two (2) bolt disc mounting bracket, removed the old disc rotor, installed the new disc rotor over the four (4) wheel lugs, and reinstalled the disc mounting bracket with the new disc rotor fitting inside the disc mounting bracket grooves. Then, I inserted the new brake pads inside the disc mounting bracket's brake pad top/bottom channel grooves (one pad on the backside/one pad on front side of the new disc rotor) secured by the new pad spring inserted inside between the top brake pad channel groove and brake pads. This installation is correct? Right? Thanks, Allen S.

More slack on the e brake will help, if you use an old pad against the piston you will be OK, it will push equally on the piston, you should not have to use brute force to push the piston in, if it does not move we need to find out why

If your pistons are totally flat faced with no indents 180 degrees from each other the pistons should push in provided the E brake actuator is not binding, you can check that by trying to move it forward and back, does the piston move in and back out easy

Keep in mind the piston does not have to travel far in to be seated, you should be able to tell by how much force you are applying also by the look of the piston and outer boot

When using a C clamp make sure the back side does not come in contact with the parking brake actuator, protect it

I am confused by the first part of your post, do you in fact already have the new pads installed with the rotors?
 
Jack,

Yes, I removed the two (2) bolt disc mounting bracket, removed the old disc rotor, installed the new disc rotor over the four (4) wheel lugs, and reinstalled the disc mounting bracket with the new disc rotor fitting inside the disc mounting bracket grooves. Then, I inserted the new brake pads inside the disc mounting bracket's brake pad top/bottom channel grooves (one pad on the backside/one pad on front side of the new disc rotor) secured by the new pad spring inserted inside between the top brake pad channel groove and brake pads. This installation is correct? Right? Thanks, Allen S.

Yes, when I put a floating rotor on I use a spacer on 1 of the lug studs and nut to keep the rotor square while installing the caliper, it helps keep things in their natural plane

main-qimg-b0c07f0d776c1d570812b5c6b13ec3f4-lq
 
O.K. Jack, as advised, I screwed the emergency brake cable's locking nut and long cylinder screw as far forward to the front of the trike as I could. Then I went back over to the left rear caliper housing and turned, what I hope, was the round "bellcrank" having the white brake cable installed in its channel. The "bellcrank" turned freely for about a quarter to almost half a full turn and, when released, it snapped back to its starting position. Was this correct? Thanks, Allen S.

Yes, I removed the two (2) bolt disc mounting bracket, removed the old disc rotor, installed the new disc rotor over the four (4) wheel lugs, and reinstalled the disc mounting bracket with the new disc rotor fitting inside the disc mounting bracket grooves. Then, I inserted the new brake pads inside the disc mounting bracket's brake pad top/bottom channel grooves (one pad on the backside/one pad on front side of the new disc rotor) secured by the new pad spring inserted inside between the top brake pad channel groove and brake pads. This installation is correct? Right? Thanks, Allen S.[/QUOTE]
 
Jack, as you suggested, I put one of the wheel lugs back on and screwed it up against the new disc rotor to keep it in place. Then, I turned the "bellcrank" wheel and the white e-brake cable moved up and away from the "bellcrank" channel. In turn, I pulled on the white cable to loosen it up more. Then, I removed the rear brake master cylinder reservoir cap and used a "wood-working" clamp, similar to a "C" clamp, with front/rear rubber end pieces and was able to move the caliper piston in just enough so the caliper housing would slide up onto the disc mounting bracket around the new inside/outside brake pads. YEAH!!!!! I wanted to let all the responders know.

Next, I will use the white grease lube to coat the bushing o-rings, pin bushing inner channels and the pin bushing surfaces themselves and install them. After that I will start on the Trikes right side caliper and perform the same processes. Then, I can bleed both front calipers' rear pistons and finally the two (2) rear caliper pistons adding brake fluid as needed and reinstall the rear tires. Lastly, I will tighten back up the emergency brake cable. If I face any new challenges on the rear right side I cannot figure out, I will get back in touch with you.

I would like to say a special "Thank You" to all the responders. I do not believe I would have figured it out without all your help, written assistance, and instruction. Best of luck to all of you in the future. Allen S.
 
Good deal, adjust the E brake first to hold 2-4 clicks down, release and bleed the rear brakes

You can slight crack both bleeders open and let it gravity bleed, then close them, pump the brakes to seat the pistons, use slow 1/2 pumps til firm pedal, re bleed each rear caliper a bit more til you see no air bubbles present

Using the slow pump of brakes insures no air bubbles, 1/2 pumps insures not scoring the master cylinder by over extending the piston cup

You have it under control now, I will catch up here later, I am going for my afternoon ride
 
Jack,

First of all, a special "Thank You" for all your responses, written instruction, and helpful "tips", especially the one about the bell-cranks needing to turn freely, to allow the rear caliper pistons to recess. Also, last evening, I advanced back the emergency brake's long cylinder screw (emergency brake pedal lowered to first click, felt resistance, followed by lowering pedal to 4th click and rear wheel would not turn) and secured the cylinder screw in position with the locking nut.

This morning, I am going to start the rear brake bleeding process. However, before opening the rear left/right bleeder valves, don't I have to first bleed the front calipers' rear brake bleeder valves?

I will be following your instructions to, (1). "Slightly crack both bleeders open and let them gravity bleed and then close them. (2). Pump the rear brakes to seat the pistons using "slow" 1/2 pumps until firm pedal. (3). Re-bleed each rear caliper a bit more until you see no air bubbles present. (4). The slow pump of brakes ensures no air bubbles plus 1/2 pumps ensure not scoring the master cylinder by over-extending the piston cup".


I will let you know how everything turns out. Once again, "thank you" for all your help.

Allen S.

Yes, sounds like you got this done good

I will check your thread later today, best of luck, glad to help

Front- left

Front-right

------------------------------

If you continue to do rear brakes :

Front - left (lower bleeder)

Front - right (lower bleeder)

Rear left

Rear right
 

Welcome to the Trike Talk Community

Join our vibrant online community dedicated to all things Trikes! Whether you're a seasoned rider or just starting out, this is the place to share experiences, tips, and stories about your three-wheeled adventures. Explore modifications, maintenance advice, and rides, all while connecting with fellow trike enthusiasts from around the globe

Forum statistics

Threads
55,293
Messages
786,257
Members
22,766
Latest member
Delverc
Back
Top