Before I

Do not pin or set screw the axle.

Axle must be solidly tight. You will get some weird flex and gyrating if loose.

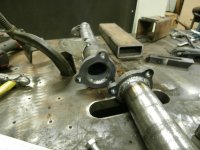
The best way I have found is turning a step on a spacer and press bushing into stay method.

In mine I was able to up-size the seal and that gave me the meat (metal thickness) to work with.

20180930_082116.jpg
 
20180930_085321.jpg

That axle is tight.

Stepped spacer.

Bushing pressed into stay.

Trapped between rocker side and step shoulder. And by trapped I mean just enough clearance to rotate freely on the stepped spacer.

20180929_085702.jpg
 
I said set screw for the axle as I seen it being done, and it might have been on the Triumph search. Some do odd different things. I looked at it as the extra measure to help secure the axle distance between the rockers. Just say you have 7" distance needed for everything, even that little extra clearance for free movement, you tighten up the axle nut to that key position, and I thought the set screw just help held all in that position just in case the axle nut backed off for some reason.

Not done, just a thought, so eliminating that thought.

Now on to the brake stay set up. I see what you did, that is the ticket. Just turn the OD of the spacer down enough to hold the bushing on the end. Nice tight fit so bushing is not rolling on spacer, spacer cut to correct length hold the brake stay in it's positon, no side to side movement.

I see this all working. Now I will get to the drawings and material and see if I can make it work. I have to have enough metal at the lower end of the brake stay for the larger bushing dia.

I need to do this, getting this nasty feeling in my stomach, like I may not have enough material for such a correction.
 
The nut does need some kind of safety back up.

A lock nut, a castle nut and cotter pin, ect.

Something that if the nut gets loose it dont fall apart.

I suppose a set screw in the right place could do the same thing.
 
The Dewalt 1/2" bit took forever to punch through, but got it done, started on the 5/8" step.

Now I checked it out, if I go to a 1" hole in the brake stay, than I have 3/16" thick distance to the outer edge of the pattern. And I corrected myself, press fit bushing into brake stay and let the bushing roll on the stepped spacer.

I did some looking for spacer's, did not make up my mind yet, as the available size varies on what type of material, so first I need to find one large enough for what I need.

If I go 1" OD on bushing with 3/4" ID so I have 1/8" wall on bushing, well the spacers wall thickness will only be 2mm thick for the 1/2" distance the brake stay and bushing take up, than the spacer steps up in OD and a thicker wall, but for only 6/16" of an inch, the total length for the spacer is 7/8".

More drill press time.
 
Still on the drill press, but when I was thinking about it all I do believe that the meat of material should be on the step spacer, if the flanged bushing is to revolve on it.

So I have the flanged bushing with a 1" OD and a 7/8" inner dia., custom cut to 3/8 " long for the brake stay, bushing press fit into brake stay.

The 1 1/8 " OD spacer with the 17mm ID will have 1/2" of a end turned down to the 7/8" dia. for the brake stay bushing. This basically gives a little over 1/8" thick spacer wall where the flanged bushing will ride. I am still looking over McMaster site for what is needed.
 
sounds like you have got it figured out.....I would not want any less than 1/8 wall on the spacer, that said, there is very little clamping force on the axle bolt/nut. But you don't want a thin spacer compressing and making for a loose axle bolt. There may be torque figures for the bolt. maybe Rex has a figure. On my setup the spacer for the wheel bearings was about 1/8 wall if I recall correctly.

I do not like, or trust nyloc nuts......I use castle nuts and cotter pins, maybe old school, but things stay together.
 
Rex, just hold the drawing of your setup in front of the mirror, than you see what mine is.

The idea of stepping down the spacer creating a lip to hold the brake stay/bushing in position is a solid way to do it. The flange of the stay bushing will be facing out ward towards the rocker, but for alignment the brake stay's position is up against the factory seal spacer, in fact for the final alignment step of it all that factory bushing might need to be shaved a little, or shimmed out away some. The location on the spacer step will solve that issue.

3 1/2 hours on the drill press and not even half way yet, and a hard day today, so maybe tomorrow I will get more done.

Hope all have a good night.
 
So it did take another 3 1/2 hours or so to get the 5/8 " holed drilled, but the drill bit does not even looked used, okay some people can tell you it was used.

I was wondering about that torque setting, thank you Rex and Larry.

Help me understand why the Brake Stay bushing can not ride on the axle.

How do I keep the brake stay in alignment, the inner side rides up against the factory bearing seal spacer, right now all says that is dead on the mark, and the outter side of the brake stay is help by the larger dia. spacer that is between the rocker and the brake stay.

I ask because I made the brake stay with 3/8" clearance around the bushing hole, that is is if it was 3/4" OD.

Now, well if I go 7/8" OD on the stay bushing, we have a heavy 1/4" material left, if I go to the 1" hole we have only 3/16" of material around the bottom/sides of the hole. With this being 3/8" thick steel would this 3/16" be enough material around the bushing hole for the brake Stay ?

I thought I had the step spacer ordered, but in the end I have to order 5 of them minimum, and at 36.00 each, I had to pass on it, but most of the other hardware is on the way here.

I ask this because, if a steel spacer is riding the axle and the brake stay bushing rides the spacer, axle still gets wear from steel spacer. My mind says it would be more wear than that of the brake stay bushing riding on the axle.

I do pray this 3/4" hole drill's much easier than the past holes, a I am getting a bit worn out with it.

I hear you about the step spacer, a very solid idea, Bammmm! just hit me upside the head......The overall distance the spacer covers the axle is side to side strength, plus the step design gives side strength in holding position. This is far more than the 3/8" wide brake stay would cover. Yes it would have side support, but just not the same overall axle support. I am good, I see why and how it is better than the other way. I am sure each way works, just one is a better method than the other. I will spend more time trying to find my step spacer material today.

Thank you all and have a great day, Hump day it is, in enjoy it my friends.
 
Okay I have another 3 hours with the 3/4" bit in the drill press. I figure tomorrow I will get it done all the way.

I found my spacers, one I will have to get turned for the brake stay bushing, but I found it and I will have over 1/8th thickness to the spacer, and the nice thing is the spacers are 17mm ID x 26mm OD x 28mm long. I have to cut the length to what I need which is 22mm's, or near that, so I am excited as it was a good long day, but going forward.

Oh Rex, how buzzy are you ? I am thinking you may have been more right about making my own set of tree's. Not sure about getting holes drilled, but cutting them out I can do. My mind was lost thinking I had wasted money, but the home built trees would still be with the 1" stem, so bearings and neck would be the same, duh...……..

Still have to get quotes back to compare cost, but it is looking like I might get it done faster if I just make my own larger bored trees.
 
can't help with trees except to say, check out possibility of a machine shop with water jet or wire edm (edm is slower, but more precise, and may be more expensive) to cut tree profiles and do the holes and slots of needed. I did mine by torching and boring with a mill drill, sawing slots with a sawzall etc.

But 2 yrs later a good friends shop got a waterjet machine , woulda saved me a bunch of work, and maybe nicer trees.

Rex will know more about this....I don't know how to program or run these machines, but they can do beautiful work!
 
It is easy for me to say "just make ya one"

But I do forget it ain't so easy for everyone.

Yes I do a lot of cnc programs.

I do not have a wire.....almost got one early this year.....but no....not enough work for it.

So yeah.....I would of stayed after hours and trolled the shop, picked up a scrap bit of metal off the floor, and whittled out the axle spacers in an hour or so.

Most of my machinery is large. Do have some normal size stuff in the manual shop.
 
Okay I have another 3 hours with the 3/4" bit in the drill press. I figure tomorrow I will get it done all the way.

I found my spacers, one I will have to get turned for the brake stay bushing, but I found it and I will have over 1/8th thickness to the spacer, and the nice thing is the spacers are 17mm ID x 26mm OD x 28mm long. I have to cut the length to what I need which is 22mm's, or near that, so I am excited as it was a good long day, but going forward.

Oh Rex, how buzzy are you ? I am thinking you may have been more right about making my own set of tree's. Not sure about getting holes drilled, but cutting them out I can do. My mind was lost thinking I had wasted money, but the home built trees would still be with the 1" stem, so bearings and neck would be the same, duh...……..

Still have to get quotes back to compare cost, but it is looking like I might get it done faster if I just make my own larger bored trees.

not sure what u r looking to do

these are some parts we flame cut

not by any means as nice as machined but a whole lot cheaper obviously the holes were drilled an spot faced

you can hand draw what you want an we can flame cut it from the drawing

let me know if we can help

stace
 

Attachments

  • P1010008.JPG
    P1010008.JPG
    65.8 KB · Views: 124
  • image023.jpg
    image023.jpg
    112.6 KB · Views: 120
  • image019.jpg
    image019.jpg
    115.3 KB · Views: 126
Maybe I missed an email or phone call, but contacted 3 machine shops, only 1 replied and referred me to another I had already submitted a quote with. Maybe it is just to much cost and they do not want to break my heart, not sure will try again in person this time.

The tree material is thicker than I can handle, jigsaw and metal blade works on thinner material, but not even sure if I can do the 5/8" thick rockers, sure not liking another 1/4" to drill out. It would take and wear out this cheap drill press, or me, LOL.

My trees are hidden up under the fiberglass body and I am limited on room.

I have zero metal working tools, a few flat and round type files, a few drill bits and taps, but not much else. I was more into wood working tools as I like making flutes, but still no lave to help it all go faster, so lots of hand work is what I do.

Okay thank you so much for all the help and offers. This is awesome as I need to see what options I have available as locals have not stepped up to the plate yet.

3/4" thick tree material is just out of my scope of abilities and tools. I can work the edges and surface to clean up, but that is about it. Moving forward against all obstacles...……….
 
being the trees are hidden by the body .....that fact means a flame cut on the outer profile will be fine, maybe some cleanup and radius work with a 4 in grinder with a flap disc.

talking about the lower tree now...

the bores for the tubes and stem bolt should be straight with a good finish and accurately located.

also slots for clamping tubes in lower tree.

Now talking top tree...I welded in slugs, and drilled and tapped them in the top end of my tubes, therefore I have 2 holes drilled for the bolts that fasten the tubes to the top tree. the only other holes are for the handlebar risers and the stem bolt.

the fork tube boltholes and the stembolt hole were located with the 3 holes in the lower tree.

there are many ways to do this, my method was dictated more or less by what tooling I had around my shop, which was minimal compared where I used to work.

Don't be afraid to get around your local machine shops, machinists, may seem like a cantankerous lot, but they are not, just very busy and doing stressful work.
 
So looks like I have to go into Reno and find a machine shop, not that I had any taker's yet, but I will hunt one down after this holiday is over.

I wonder if you can get a screwed up drill bit, for the price you would think not, but I have spent lots of time on this 7/8" hole and it is only 1/3rd of the way done. I really hope the final pass goes a lot faster. At least when I get this Brake Stay done I can say I did it all, okay the work, all the advice and help came from this site, so we did it actually.

Okay need to get things done, hope all can enjoy this holiday.
 
LMAO

Not the drill bit, rather the drill press operator!

Some point the lock nuts for the drill depth had vibrated and worked themselves down to stopping the bit from going down any further.......wonder how much time and cutting oil I wasted.

This episode did teach me, again, to make sure all is set as it should be with the power tool before turning it on, and if you turn it off, make sure all is as it should be before turning it ON again.

Feel like a fool, no reason for such an error. I would blame it on to many beers, but I do not/can not drink. Just me rushing around to much trying to get to much done at the same time, slow down time!;)
 
My drill press will do the same thing......I always look at the bit, reasonable sharp... chuck it up start drilling and WTH ....bit can't be bad....hit a hard spot in the steel...no, finally look at the depth stop, it vibrated down.....happens about 3 or 4 times a yr. LOL

thought you were spending a lot of time drilling....hope it goes better for you!
 
Well I did learn a little trick on the 7/8" run, so this final pass should be my best. Have many hours on the press and I know how to keep her slow and easy and not heating up, key is never any smoke.

I had to reset all up after the clean up, than the double check on the bushing out dia and the drill bit, should be close, but still should press in. I will only know the truth when I get done, should be some time today.

I got the outter points of the drill bit to break surface of the metal and got the last hole started about 1/64th deep before my day ended.

I hope all have a great Hump day, mine is already planned out, enjoy your day.
 
still here.

Well I am alive, laptop bit the dust Friday evening, guess during a search I let the bug in and next thing I know my system is taken over by someone or something.

Any way I had to pull the battery pack from the laptop to end it all, Wi Fi was my enemy this time.

So I went and bought a new laptop while the wife tried to clean the old one. She had to remove hard drive and use her system to clean the external drive, than she was able to save all my files to thumb drive for me. Now I just have to get all back on this new laptop.

Before all that happen, I had finished a drill session and decided to feel how hot the motor was, NO touch hot! so I shut it down, looked over the 1" drill bit, it just was not working as well as the others, factory sharpened with no cutting edge ?

Not sure, but no more local, so I had to order it off line, should be here today or tomorrow. I can only pray that all works enough to finish this brake stay.

As I was down I had a visitor, old boy I talked to about front ends, he stopped by with a set of 41mm HD triple trees and said I need to try them because he was able to slide a 1 5/8" dia. bar into them, he was right they did work, but like 12" wide which really push's that max limit of room that I have, but I have played and see that it is possible, how tight will it all be I can only find out when I set the body on the frame after the front end is mounted.

Maybe there is a mock up I can do of it, will have to play with this more.

My point is this, no milling the end of the tubes to fit the triple trees, as I decided I will try to drill out the 39mm TT set to the 41mm size. If all is good I will go with this 9" wide set of trees.

It will get done, just not as fast as I wanted.:D
 
Pack the crack tight with shims.

Dont cover the bolts holes.

Put the bolts in and tighten down onto shims.

Set them up on the mill and bore to size.

Take bolts out.

Pick out the shims and de-burr.

Easy enough to make them whatever size you want. Or turn the top of the legs to fit your yoke.

You seriously need a machinist friend, family member, son in law.......someone.
 
Yes I do agree with that one Rex.

I am still looking and trying to figure out how I will get this done and I need to make another personal appearance with my drawings at one machine shop.

I did some paper work and the 12" wide 41mm trees have the same needed axle distance as the smaller 39mm set ( that is if I mount the rockers on the inside edge of the main fork tube ).

I actually see plenty of meat on the 39mm tree, marked out the 1 5/8" dia. that is needed, now just need to get it done.

Thanks for all the help everyone, slow right now, but it is getting done, cleaned the plates for the rockers today and worked on the template with the spring fork mount hole in the design. I just need to make up my mind, sleep is need now.
 
Take a look.

The new bit is delayed by 4 days, wow, but I need to wait and hope the new bit and drill press last long enough to finish this last hole on the brake stay, oops I do have one smaller hole to drill out for the retraction arm for the brake stay.

worked on the plate more, just hand sanding the mill finish off, and realized something about the rockers, trail, flop factor, and all that I read over again.

Not much difference in the trees other than the fork tube size and the difference in width, but do come up with a little longer over all fork tube length with the 39mm trees compared to the 41mm trees.

A drawing of the front end, what I am working at doing, still need design help and help deciding suspension, solid springer, or a mono shock with coil spring, or use the 5 3/4" rocker and use a set of shocks attached to them?

20181017_152053.jpg

The upper left has some info if I used the 5 3/4" long rockers, and the upper right hand corner has the info that relates to the drawing and the 5" rocker distance.

I had a straight line from rear pivot point to axle point, measured 2 1/4" from center of RPP, dropped down 3/4" from that point for the center of the hole for the spring tube. Later I ran the straight line from the RPP to the center of the spring tube hole and extended it so I could measure how much higher the axle hole center was, it is 1 1/2" higher than the RPP.

That is what I like look wise, not a parallel rocker look as I think the front wheel sticks out to far, I wanted the tighter look and that means shorter rockers. It was only 1/2" shorter overall tube length with the 5" rockers. Oh I did get the template of the rocker made today, just a little fine edge sanding left to do.

I do not want to be a copy cat, but I like how Rex's shock/suspension is set up.

I think the 39mm 7" wide trees would look the best, all tight, but I will have to make a tree to support the mono shock or something like that, if I can get them bored out successfully.

I will get there, so slower than I wanted.
 
I would be tempted to use the springs from the old front end.

But I do prefer hydraulic dampening. That is why I went with a rear shock. But more parts to make. Almost the same thing as the brake torque reaction link but up top.

20150131_102940_zpsqrbqxkwl.jpg
 
new bit came

I do see your point, man you did nice work on your Trike Rex.

I did get lost yesterday and did not get to check out the old spring's compression rate, and did not get to that today either.

So the new drill bit made it here late Friday afternoon, of course I had to get on the drill press.

I have spent the day at it and I am almost done, just that last little bit that is seems to take for ever.

On the other side I tried one method to see how that 12" wide set of trees would fit up inside the fiberglass body, very tight fit, but it does look like it will work, but I still have to check how much turning radius I have which means a dead on mock up, or get the trike all together and than see how it fits. Worry a bit more about it later tomorrow. Back to the press before dinner

time.

Okay it took a little bit of time after dinner, but I finished.

I wore out the cheap drill press, now I can drill egged out holes with out trying.

Motor seems to be doing okay, and piece a crap is not made to be taken apart and repaired.

I got my money's worth out of it over the years, time for a new better drill press. Clean up is always a pain, but it is part of the process.
 
Last edited:
a bit of a bummer.

wow, the chuck gets major wobble going when it is extended during the drilling process. Not good for any accuracy work, at least not what I like from a drill press.

So wife herd me throwing a fit in the garage and ran out and bought me another bench drill press. Skill brand this time, and at least it is made so I can replace worn parts if ever need be, maybe it will last longer NOW that I understand them more.

Now I will just make a sander with the old one, winter project I am sure.

Okay Spring Tension........ top are 5 3/8" long and right side has 66.66 lbs per inch and the left has 57.14 lbs per inch.

Lower right is 5 13/16" long and the left is 5 5/8" long, both have a 200 lb. compression per 1 inch.

Working the SS brake stay is very time consuming, okay not so much if you start out right, I did not, but figured it out a bit to late in the game.

It is real close to being finished, well at least all the rough sanding to get to polishing stage.

Slowly I am getting there.

:)
 
If whittling iron.....instead of whittling wood.....is going to be the new hobby.......

https://rover.ebay.com/rover/0/0/0?mpre=https://www.ebay.com/ulk/itm/222532686607

Wow, those are very pricey to me, but I see the difference between what she brought me home, but hay it is a step up better than what I had.

Not at all for this type of metal work, but it covers most of what I will do in the future.

I did get smart and use the electric shuffle sander with 40 grit paper, than smooth with 80, 120, and right now 150 grit. All 3 are by hand with a sanding block, learning ............

A few pics, figure I need to run the 40 grit again to get down deeper to remove some discoloring, sand my way back up to 200 and than buff it out.

20181023_135901.jpg

20181023_140132.jpg

20181023_140148.jpg

It is a process that does take me time, but I do enjoy using my hands, probably why I like working with wood and carving it.

I need to go make friends with a machinist, or a person with the loaded shop that has all that is needed.

:D
 

Similar threads

Welcome to the Trike Talk Community

Join our vibrant online community dedicated to all things Trikes! Whether you're a seasoned rider or just starting out, this is the place to share experiences, tips, and stories about your three-wheeled adventures. Explore modifications, maintenance advice, and rides, all while connecting with fellow trike enthusiasts from around the globe

Forum statistics

Threads
55,373
Messages
804,515
Members
23,942
Latest member
nmbr1soonerfan
Back
Top Bottom