I have just purchased a 1986 Stires Stallion Flat Back Trike. Looking for a detailed parts manual. Also any wiring diagrams. Whoever wired this trike originally needs their knuckles whacked. LOL. Having a hard time trying to figure out what year of volkswagen was used for brakes etc. this trike was purchased directly from Stires. I have all of the original order documets. Any help would be appreciated..
Navigation
Install the app
How to install the app on iOS
Follow along with the video below to see how to install our site as a web app on your home screen.
Note: This feature may not be available in some browsers.
More options
You are using an out of date browser. It may not display this or other websites correctly.
You should upgrade or use an alternative browser.
You should upgrade or use an alternative browser.
Stires Stallion Flat Back
- Thread starter Lost Newfie
- Start date
Welcome to Trike-Talk....Glenn.....:clapping:
peteg59
Meme Master
Welcome to TT Glenn.
The serial# on the engine block will tell the year of the engine. As for the transaxle, there is no way to put an exact year on that.
Is it a swing axle or IRS? Depending on your answer, a year range can be established...
The serial# on the engine block will tell the year of the engine. As for the transaxle, there is no way to put an exact year on that.
Is it a swing axle or IRS? Depending on your answer, a year range can be established...
radismukes
2250+ Posts
:welcome:To the Trike Talk Family! FROM SOUTH

:wave4:
It has likely been rebuilt/apart several times and is pieced back together with whatever.
A lot of the vw stuff interchanges.
Pictures of the vw parts and we can narrow it down a lot.
The cast in numbers that stick up above surface do not mean much and do not identify anything.
You are looking for numbers that are stamped into the metal.
Pictures, pictures.
As far as wiring goes..
I do not have a diagram specific to your trike.
Most of it will be wired extremely similar to a vw. The main difference being the use of the motorcycle switches on the handlebars instead of the dashboard switches.
- Thread starter
- #7
The trike is all original. Never touched. Only 691 miles since built new. The engine is by Dune Buggy Performance in California. It hasn't even had its first oil change yet. The only thing wrong is the electrical. Poor choice of connectors and wiring methods. Lots of t-tap connectors and tape. Going to have to change everything to proper heat shrinked crimped connectors and soldered joints.
That is how my VW trike was wired, but by to many hands trying to correct or add stuff to the electrical system.
I started by drawing out how and what was wired on the trike, looked up other wiring of trikes and VW engine's, and figured out the proper and better way, than I drew up the wiring diagrams for the circuits and rewired the trike. I also put in a full instrument panel at the same time.
I would say you have a nice winter project if you want to get it done correctly, also all has years of weather to it, so look over the switch's and any relays for any that may or should be replaced.
Not all install all correctly, I actually have to re do my light circuit so relays are used and I do not burn things up. I have learned a lot on this site, plus the proper way a fuel system should be set up, it does not have to be that way, but it is safer.
Welcome to the site and your new Trike, sounds great and hope all checks out ready to rumble.
brake ID and wiring
I think that any parts list you might find for Stires or Arizona trikes would not help you; neither company is around. I have no idea who owns the rights to those molds and parts now. If you are missing parts, you will have to either fabricate or find a replacement from someone like Possum Pride trikes.
To help ID your brakes, see this page:
https://www.thesamba.com/vw/forum/viewtopic.php?t=550290&start=0
The pictures are missing but there is valuable information there for identifying the parts you need for the brakes.
Not knowing how comfortable you are with wiring and what you are starting with (what is already on the bike and usable and what needs to be done to make it right) makes it difficult to advise you on a course of action. If it is truly FUBAR, I would replace it all. You can find relatively inexpensive kits (EMPI makes one) to provide the wires and a new fuse block. If you want to update to blade fuses now is the time to do that.
Here is an EMPI harness with a wiring diagram that you should be able to modify to use for your bike:
https://dunebuggywarehouse.com/wire-loom-kit.html
Just delete the extra headlight and wipers. That diagram is set up for a VW speedometer, where all the dash gauges and warning lights lived. Easy enough to work around with stand alone gauges by following where the wires are going from the speedometer.
If you are running an alternator, the AMP light, filament type 2W, is absolutely essential. See this article:
http://www.vw-resource.com/alternator_wiring.html#alt
Let us know if you need advice on 'how-to' splice, solder, etc.
- Thread starter
- #10
Pulled body off today. Tagged and identified all circuits. Starting to lay out my custom wiring harness. Calculating correct amount of fuses and relays to do the job. Will be adding remote controlled hidden underbody lighting, Line lock and other electrical goodies. Will be upgrading to all LED running lighting. I don't mind putting in a bit of time and effort to do a job that will last for the life of the trike and not having any electrical issues down the road.
Keep you head up, you can do this...….Yes it helps to have some talent for the task, but if you never played with it, does not mean you can not do it, just you have not tried yet.
My point I owned a bug as my first car, so had another or two over the years, a Trike NOT, a crotch rocket yes, but kept it factory serviced and so I knew how to ride...……..
I have done a lot to this trike I did not expect nor did I think I could do it.
Remember to take the time and draw out a schematic of the wiring you did, if you sell it goes with the trike, if you keep it than you have a way to work on what you did. If that is not your cup of tea, maybe some one can help you.
A new Adventure, enjoy it.
- Thread starter
- #13
Completed full identification of all circuits . Put everything in to auto cad. Took lots of photos. To add to my Trike Documentation File. Will start tomorrow to figure out all the custom extras that I will add to the Trike wiring. Full wiring clean up will begin on Saturday. Body is heading out tonight for full polishing and buffing.
Sounds like all is moving forward at a steady pace. I hope to get back to it this afternoon, but glad to read all is working in your favor.
My 1972 WilMac Kit on a 66 vw motor and a unknown vw van rear end
had TWO fuses TOTAL. LOL
If I would have kept it, the last of the old vw mechanics suggested a complete
rewire job.
had TWO fuses TOTAL. LOL
If I would have kept it, the last of the old vw mechanics suggested a complete
rewire job.
Completed full identification of all circuits . Put everything in to auto cad. Took lots of photos.
Sound like you have it handled. Excellent job.
Lots of folks start out with a universal dune buggy harness and fuse box. The only big benefit is having a big rainbow of colors. Sure makes it easier to keep up with which wire does what.
Mine is a jumbled up mess of ford parts hooked to Chevy parts hooked to Kawasaki parts hooked to vw parts and on and on.....so color this hooked to other color that....to no end it seems.
- Thread starter
- #17
Here is an electrical question for you Volkswagen techs. My generator wiring is mixed up. No surprise LOL. Here is what I have. Generator Df hooked to Regulator D+, Generator D+ hooked to Regulator Df and Fuse Panel, Regulator 61 hooked to Amp Meter and Regulator B+ to Battery. Everything runs and Battery Charges?? I know that I have unregulated Power. By rights I should be able to change everything back to what it is supposed to be (Df to Df, D+ to D+ and connect fuse panel to B+) and everything work correctly with regulated 12v to the Battery and Fuse Panel. Should the generator even be woking correctly wired backwards?
Hummm, looked at mine and I do not have a regulator wired into any of it.
It all starts and works, so I thought, but know I might have an answer to why some gauges act a bit off. Looks like I have another project/issue to resolve before spring time comes.:clapping:
It all starts and works, so I thought, but know I might have an answer to why some gauges act a bit off. Looks like I have another project/issue to resolve before spring time comes.:clapping:
Should the generator even be woking correctly wired backwards?
The generator only knows current paths. If it has those, it will gen. Wired backward, it won't work correctly. My guess is it would generate a runaway voltage until it overheats.
Hummm, looked at mine and I do not have a regulator wired into any of it.
It all starts and works, so I thought, but know I might have an answer to why some gauges act a bit off. Looks like I have another project/issue to resolve before spring time comes.:clapping:
Andy, do you have a generator or an alternator? More recent alternators have the regulator mounted on the back of the alternator. They do need an exciter wire from the idiot light but otherwise they only need a battery to charge.
As far as your gauges go, the most likely culprit is a bad ground. A close second would be corroded terminals. Either way, you do have another project/issue to resolve.
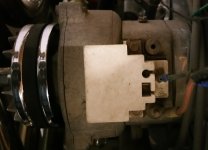
Not saying I have a memory, but the generator I remember on the old 65 bug was just a straight round thing.
This is a late 73 model case, so it might have 74 stock accessories to the enginge.
I am not being lazy, just thought a pic might help others (and me ) figure out what a newer generator or alternator looks like.
I do agree after looking over it a bit more, I do need to address this issue while all is open and exposed.
Cheers to everyone and have a great day and a better weekend.
alternator
Yep, you have an internally regulated alternator. Here is a simple wiring diagram for the charging system:
https://www.limebug.com/how-to-guides/view/48/
It looks like those connections have been there for a long time. It is probably wired correctly; that D+ connection is going somewhere. If it goes to an alternator light and then to the ACC terminal on the key switch, or a fuse that is live when the key is ON, you can mark the charging circuit off your list.
Not really shown on that drawing is the importance of a good ground to the alternator. The easiest way to check for ground is with a test light. Clip it to the positive terminal on the battery. Probe the negative battery terminal and note the brightness of the test light. Now probe the alternator case. The light should be just as bright as it was going directly across the battery. In that case you are done with engine ground checks. If the test light does not light, you have to find the break. If the light illuminates but is dim, the ground circuit is resistive. In either case, probe the bike frame, the transmission, and the engine. A poor connection can be anywhere in the circuit, even right from the battery post. The goal is to clean, repair, or replace whatever is necessary to get a bright test light on the alternator case.
I do agree after looking over it a bit more, I do need to address this issue while all is open and exposed.
Yep, you have an internally regulated alternator. Here is a simple wiring diagram for the charging system:
https://www.limebug.com/how-to-guides/view/48/
It looks like those connections have been there for a long time. It is probably wired correctly; that D+ connection is going somewhere. If it goes to an alternator light and then to the ACC terminal on the key switch, or a fuse that is live when the key is ON, you can mark the charging circuit off your list.
Not really shown on that drawing is the importance of a good ground to the alternator. The easiest way to check for ground is with a test light. Clip it to the positive terminal on the battery. Probe the negative battery terminal and note the brightness of the test light. Now probe the alternator case. The light should be just as bright as it was going directly across the battery. In that case you are done with engine ground checks. If the test light does not light, you have to find the break. If the light illuminates but is dim, the ground circuit is resistive. In either case, probe the bike frame, the transmission, and the engine. A poor connection can be anywhere in the circuit, even right from the battery post. The goal is to clean, repair, or replace whatever is necessary to get a bright test light on the alternator case.
- Thread starter
- #23
Stires Stallion Update
Finally got the wiring 95% done. Just got to plug the body in when I am ready to mount it. Getting sick and tired of polishing chrome. LOL. Got to figure out a good protectant for the chrome engine components. There are places that will never get polished again, when the body goes back on.
The next project is to look at the Springer front end. Rusted pretty bad. Will have to consider powder coating. Any Suggestions? Here are a few questions. Can the springs be powder coated or will the paint crack from flexing. The same with the front wheel. Strip it down, do the hub, rim, spokes and brake assembly. Reassemble and balance. I need also to track down the correct torques for reassembling the springer. Will post some pictures later of the springer.
I have read so much about bad chrome plating and than there is the good chrome work. Rust is not good anywhere, kinda sucks. Glad you got the wiring done and are moving along. I am doing a refinance, damn takes to long, but a must if I want to survive.
My set of springer forks were used and abused. Trikes do beat the crap out of forks, so springer's are suppose to be made for the Trike. That is the best way, but if one knows all that is needed one can hopefully find a set that is already made that will work for them. Need to build the jig and make sure all are straight and align correctly.
Biggest check point is the main rear bar, or down tube, just below the lower tree mount area, the tube or bar will start bending and thin a stress crack. Yes I did also find this on my set of forks, as trikes are know for wheelies and the slamming down on the road helps create the bend in the forks.
All sounds great, hope you have a good time finishing up the rest of it. Ride safe.
- Thread starter
- #25
Stires Stallion Updates
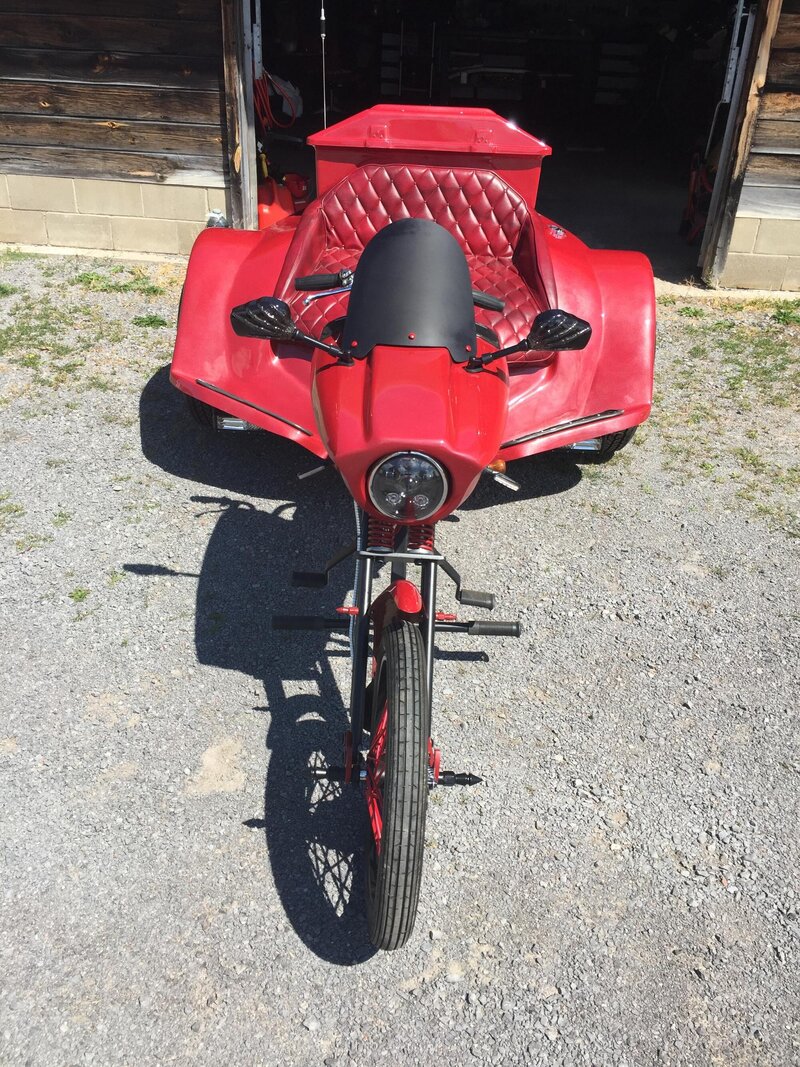
yahoo done. :clapping:. Finally completed my Resto Mod restoration.. If it can be described as so. complete rewire to modern electronics. Dropped the body in back by 4 inches, when originaly assembled there was a piece of wood put under the passenger seat mounting location and 2 supports made for the engine cage to hold the body up in the rear. All because they wanted to run a 2 1/2 in. breather filter instead of the 1 1/4 in. one that was supposed to be used. It tucked the body right down to the frame and tires. Looks 100% better.
Full LED conversion. Dropped my full load draw on my battery to about 4.5A. Starting improved drastically with the electronic ignition conversion.
Repainted,buffed and polished as required.
Enough of the yacking here are some photos.
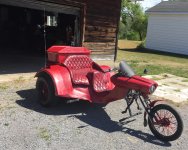
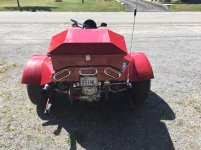
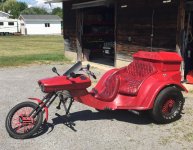


Excellent.
Get out and ride.
Be careful and safe.
Get out and ride.
Be careful and safe.
- Moderator
- #27
Nice job
:clapping::wave4:
Congrats on your achievemet, now go drive (ride?) the heck out of it.
Similar threads
- Replies
- 1
- Views
- 13,401


