Installing 14" ProAction shocks and lift kit with trike body removed

Oct 29, 2012
556
110
Centennial, CO
Name
Barry
Installing 14" ProAction shocks and lift kit with trike body removed

There's been plenty of folks that have posted about installing new lift brackets and shocks, but I don't remember reading about anyone removing the body to do it. If someone is considering this option, maybe there's some info here that might help.

Had the parts for a couple of weeks, waiting for the weather to break a bit and get a couple of friends to help out. We've installed the lift kits on four TriGlides and the Bitumo shocks on one and the 13" ProAction shocks on two other trikes. Every single time we did it the "usual" way....jacked up the trike, removed the tires and worked from under the trike. Not a hard job, but not easy to get to everything.

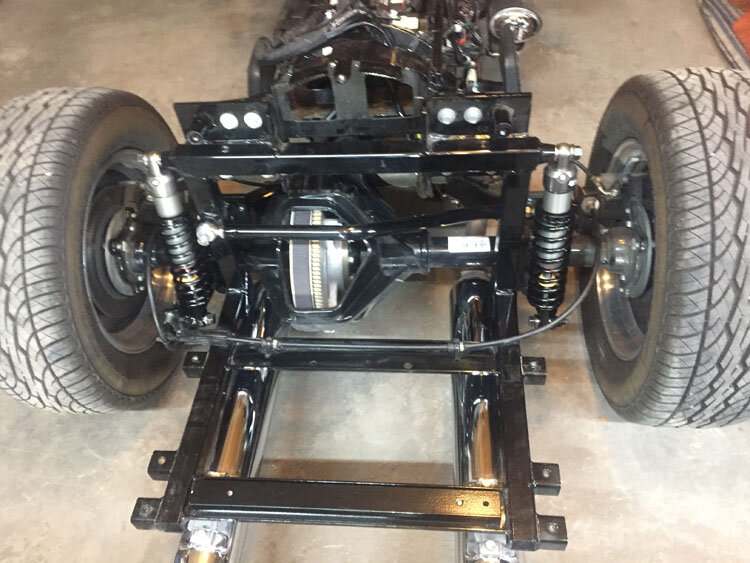
We were installing the 14" ProAction shocks along with the appropriate lift brackets, so this time we decided to take off the back of the trike and see what that did for us. Removing the body of the trike is very simple. Eight bolts and disconnect the wiring and it lifts right off. Well, not quite until we removed the passenger hand rails. Those blocked lifting the body, but that's a quick removal of only two bolts. It was not too heavy at all to lift off for two of us and we did not take off the tourpak. Once we got the body off we slid some jacks under the crossmembers and raised the trike up only high enough to slide the wheels off. Once the wheels were off, it was amazing how accessible all the bolts were compared to working from underneath.

We knew we didn't have to remove the body. It was more that we wanted to. Partly to say that we did it and also to get a better, closer look at everything. Of course after we got everything off, the frame and exhaust pipes were filthy, so we did "have" to clean them. Installing the new lifts and shocks were a breeze with such easy access to everything.

Putting the body back on was also very easy. It just kind of slides right in place and with a little tug here and there, all the holes lined up. Then it was just reinstalling the bolts, torquing everything to spec, reconnect the wiring harnesses and it was back together in a very short time.

Not sure how people install these lifts and shocks in an hour or two like they say. We must sit around and BS for a good bit more time than others because we took about 3.5 hours, but had a blast doing it. It's pretty amazing how simple the back end is.

Next up is to ride and see what I think. Cold and rainy out, so today was not a good day to test the new shocks. Supposed to be in the upper 70's by the middle of the week, so I'm excited to feel the difference!

Some photos of the handiwork.

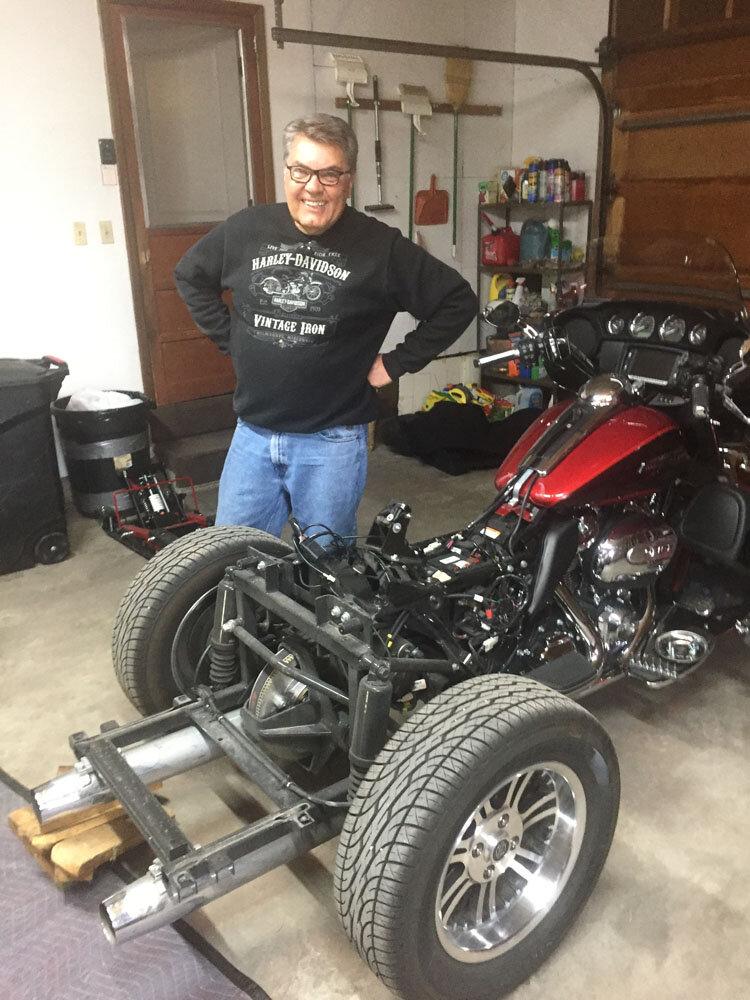
One of my friends that helped, admiring the naked back end of the trike.
Install photo.jpg

Raising the trike up to get the tires and OEM shocks off after being cleaned.
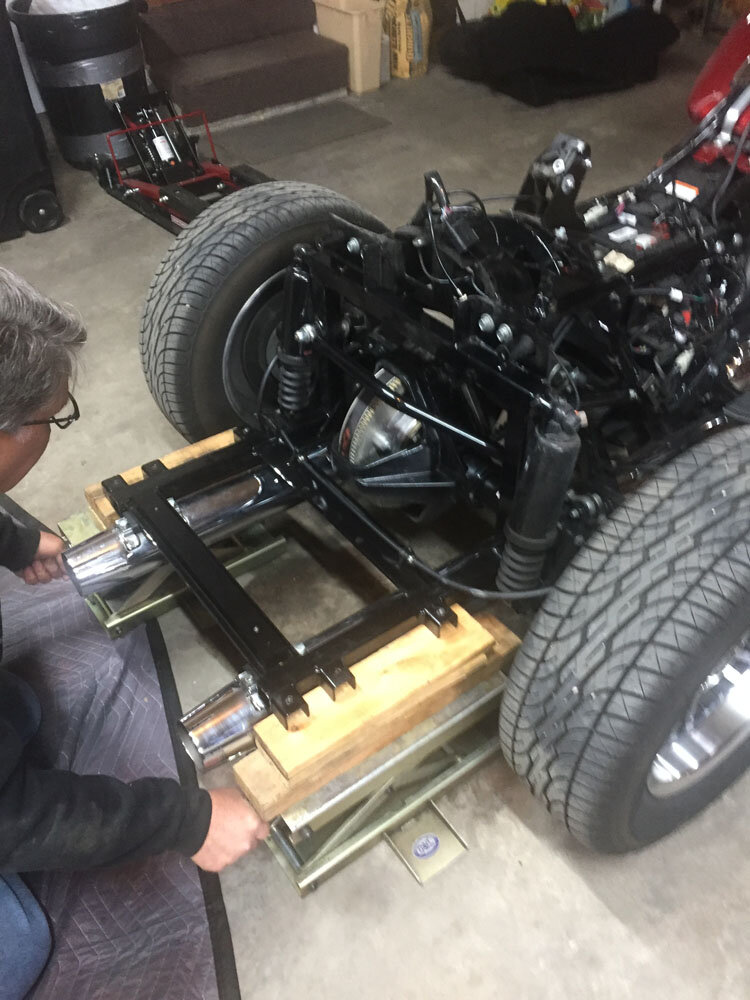
Install photo 1.jpg

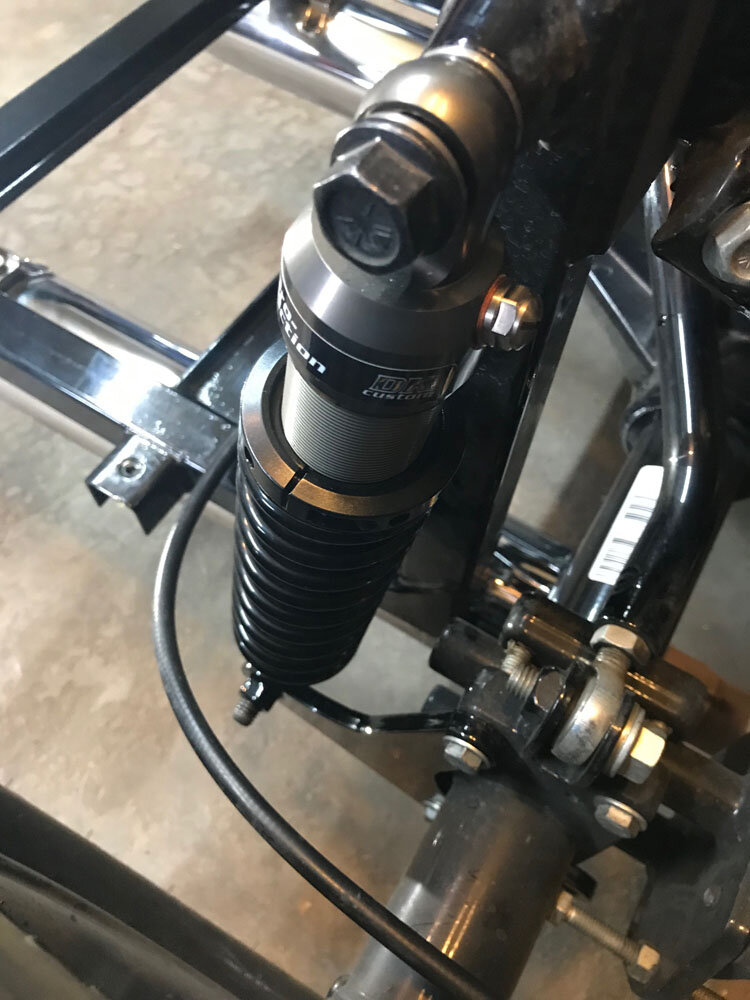
New shocks installed.

Install photo 3.jpg

Close-up of new 14" shocks.

Install photo 4.jpg
 
I know you don't have to take the body off but in your case or anybody as far that goes, it is a chance to clean with the body off, I know Kevin has had his off and he cleaned it and he had quite a few miles on his, I know Fearless took his off to do some work on his and he cleaned, I'm sure if you took it to a harley dealer to have this done, I'm sure it says in the book to take body off, not sure about this but I wouldn't put it past harley to get more money.

Enjoy the new shocks and thanks for the pics

All for now Trampas
 
Probably too late, but it’s easier to fine tune them with the body off ! ☎️

Are you talking about the "clicker" on the bottom? We tested access to it after we got the wheels on and before the body was reinstalled and it seemed pretty easy to get to. It came from DK set on the 4th click position, so I'll see how that works, hopefully today. Any suggestions on where it maybe should be set or is it too much of a 'personal' feel?
 
Are you talking about the "clicker" on the bottom? We tested access to it after we got the wheels on and before the body was reinstalled and it seemed pretty easy to get to. It came from DK set on the 4th click position, so I'll see how that works, hopefully today. Any suggestions on where it maybe should be set or is it too much of a 'personal' feel?

Was talking about the spring rate. Mine was set for 2 up. But being i ride 95% solo, i took 3 rounds up. Its a pia. To do with out removing them . ☎️
 
I know you don't have to take the body off but in your case or anybody as far that goes, it is a chance to clean with the body off, I know Kevin has had his off and he cleaned it and he had quite a few miles on his, I know Fearless took his off to do some work on his and he cleaned, I'm sure if you took it to a harley dealer to have this done, I'm sure it says in the book to take body off, not sure about this but I wouldn't put it past harley to get more money.

Enjoy the new shocks and thanks for the pics

All for now Trampas

I believe H-D says that you have to take the body off, but we knew better from all the folks on the site that have done this and other similar work under the body. Like I said, it was just a "want to" thing to get a little more familiar with what's under there. Illustrations in the manuals are nice, looking at photos others have posted helps even more, but being able to actually get up close, touch, examine, push, pull, and of course clean was more than worth the little bit of extra time.

I know there's quite a few that have had the body off, but wanted to post this and the photos so maybe someone thinking about it wouldn't be intimidated by not knowing more about what's involved.
 
Was talking about the spring rate. Mine was set for 2 up. But being i ride 95% solo, i took 3 rounds up. Its a pia. To do with out removing them . ☎️

I don't know what it's set at. To be honest, we didn't even look at that. The form I filled out for DK said that I ride 1 up 99.9% of the time, so hopefully they got it right. How do you tell what it's set at?
 
Are you talking about the "clicker" on the bottom? We tested access to it after we got the wheels on and before the body was reinstalled and it seemed pretty easy to get to. It came from DK set on the 4th click position, so I'll see how that works, hopefully today. Any suggestions on where it maybe should be set or is it too much of a 'personal' feel?

Three clicks is almost always the best setting. Some folks are good with 2 or 4 clicks. They make a pretty significant difference in the ride.

Oh, and don't hesitate to use a different number of clicks on the shocks, if that is what provides the best feeling ride to you. ie. 3 clicks on one shock and 2 clicks on the other shock.

While it is much easier to adjust the preload on the springs with the body off, it is definitely possible with the body on. Hopefully we already have them dialed in for you and you will not need to change the preload.

If you do want to change the preload, it is a matter of reaching up to the top of the shock and loosening the allen screw on the collar, turning it counter clockwise for less preload. Always do one full turn so you have access to the allen screw to tighten it back up when you're done.

Kevin
 
I don't know what it's set at. To be honest, we didn't even look at that. The form I filled out for DK said that I ride 1 up 99.9% of the time, so hopefully they got it right. How do you tell what it's set at?

You don’t, the shock guys set them up according to the info you gave. Just follow the instructions as to ware the bottom out snubber is after a good ride. Don’t hit any pot holes either !
 
I don't know what it's set at. To be honest, we didn't even look at that. The form I filled out for DK said that I ride 1 up 99.9% of the time, so hopefully they got it right. How do you tell what it's set at?

The springs are set up for you. You do not have to do anything with them....unless something changes weight wise, ie. you start carrying significantly more or less weight than you listed when you ordered.

If you want to take the time to check, on the box there should be two numbers. ie. 7 3/4" 7 13/16". Those numbers are the distance between the top and the bottom rings (collars) that the shock spring sits between.

We do not subscribe to the bottom bumper procedure that was mentioned in a previous post or is seen on some videos. It is not an appropriate way to adjust the 14" shocks.

In the following link is a full explanation on all you can do to adjust the shocks- https://www.dkcustomproducts.com/me...-Action_Rear_Shocks_Instructions_10-15-18.pdf

All the above is only if the shocks are not giving you a really nice quality ride down the road, or if you're just curious.

They should be set up well for you, and the only thing you might want to do is adjust the clicker between 2-4 and see which of those 3 settings give you the nicest ride.

Kevin
 

Cleaning really wasn’t even on my mind and it wasn’t my idea to remove the back end. A friend that helped with the shock install was the one that really wanted to take it off so we could get a better look at everything. I figured why not since it was really pretty easy to do. The cleaning was just an added bonus.

Glad and to read that you’re loving the E Series exhaust!!
 
The springs are set up for you. You do not have to do anything with them....unless something changes weight wise, ie. you start carrying significantly more or less weight than you listed when you ordered.

If you want to take the time to check, on the box there should be two numbers. ie. 7 3/4" 7 13/16". Those numbers are the distance between the top and the bottom rings (collars) that the shock spring sits between.

We do not subscribe to the bottom bumper procedure that was mentioned in a previous post or is seen on some videos. It is not an appropriate way to adjust the 14" shocks.

In the following link is a full explanation on all you can do to adjust the shocks- https://www.dkcustomproducts.com/me...-Action_Rear_Shocks_Instructions_10-15-18.pdf

All the above is only if the shocks are not giving you a really nice quality ride down the road, or if you're just curious.

They should be set up well for you, and the only thing you might want to do is adjust the clicker between 2-4 and see which of those 3 settings give you the nicest ride.

Kevin

Kevin, really appreciate your comments and suggestions. I changed the clicker from 4 to 3 and also checked my rear tire pressure (25) and lowered them to 22. That helped but still not the smooth ride I was expecting. Wednesday I’m going to change the clicker to 2 and see what that does. I haven’t lost or gained any weight and only ride solo , so no differences there. The numbers written on the box are exactly what you wrote: 7 3/4, 7 13/16, 3 clicks. Anyway, I’m hoping this fixes it and I know they’ll work because everyone that has them, loves how much smoother the ride is.

Thanks again!
 
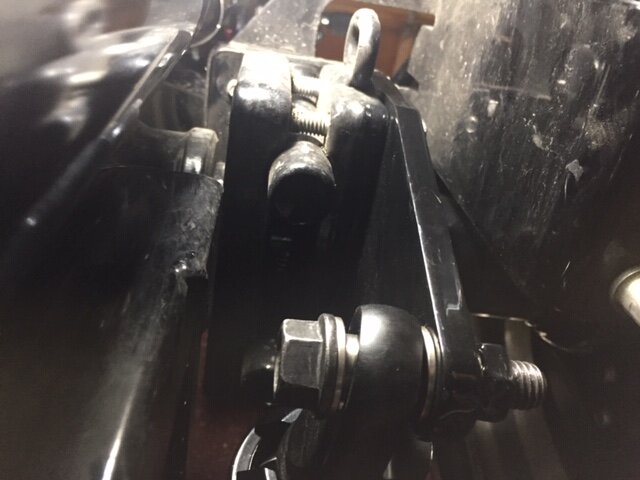
Under the trike today to adjust the clicker from 3 to 2 and noticed this. The bushings on each side of the shocks don't appear to be fully seated. When we were doing the install that seemed to be the case on all of them, but now I'm wondering if it's a problem or it's normal?

IMG_1306.JPG

IMG_1308.JPG
 
OK, last post from me on this subject. Changed the clicker from wherever it was set at (3, maybe 4) to 2. Double checked that it's set at 2 and went for a ride.

Whooohooo, what a huge improvement!!!!

Now the shocks are matching what I've read about and was hoping for. I can't even describe the difference from what I was feeling when the clicker was set higher to now. It's true, the little road imperfections and bumps disappear. Not really sure how that clicker works or what exactly it does, but it's amazing what one tiny change can make. Not even going to bother with the adjustment on the top part of the shock.

Thanks to everyone that offered up ideas and comments on this thread. And a big thank you to DK for offering such a great product and then supporting it until you're happy!
 
Under the trike today to adjust the clicker from 3 to 2 and noticed this. The bushings on each side of the shocks don't appear to be fully seated. When we were doing the install that seemed to be the case on all of them, but now I'm wondering if it's a problem or it's normal?

View attachment 70876

View attachment 70877

Looks ok from NY !

The shock must be able to swivel on the heim. Reasoning for the spacing.

What 1dn5up said- The shock eyes have spherical bearings in them so that they can pivot and move with no binding/resistance. That is one of the reasons that the PA shocks ride so smooth. It results in the shocks being able to sit catywampus on the bolts like you pictured. That is how they're supposed to be.

(most shocks just have a rubber bushing in them....less expensive, but less smooth in absorbing bumps)

OK, last post from me on this subject. Changed the clicker from wherever it was set at (3, maybe 4) to 2. Double checked that it's set at 2 and went for a ride.

Whooohooo, what a huge improvement!!!!

Now the shocks are matching what I've read about and was hoping for. I can't even describe the difference from what I was feeling when the clicker was set higher to now. It's true, the little road imperfections and bumps disappear. Not really sure how that clicker works or what exactly it does, but it's amazing what one tiny change can make. Not even going to bother with the adjustment on the top part of the shock.

Thanks to everyone that offered up ideas and comments on this thread. And a big thank you to DK for offering such a great product and then supporting it until you're happy!

That's great! Glad you got them dialed in to provide you the ride you were looking for.


What the clicker does:


It adjusts the "bleed" or flow, of the oil through the valving.

If it flows too easily your will have a pogo effect from the springs when hitting a bump.

If it does not flow easily enough you will have the bump transfer thru to your but and hands, because the shock was not able to absorb enough of the bump.

When you get the bleed "just right" (clicker) then the oil flows enough to allow the shock to absorb the bump, but not so much that there is any pogoing from the bump.

Usually 3 clicks is the sweet spot...every now and then having one shock on 3 clicks and one on 2 clicks is the sweet spot. Sounds like you found your sweet spot with both of them on 2 clicks.

Super happy that you got it sorted! :)

Kevin
 
GoSlo was wondering what you did with the body you took off without doing any damage to it, maybe you can say how it was done or maybe Kevin will chime in since he took off his body on his 2014 or anybody that has done this, guess I could have started a new thread on this but thought I would ask here, also I enjoyed the pics and the write up

All for now Trampas

After all the bolts were out, we lifted the body from underneath the toupak and the fenders, with most of the weight being held under the tourpak so as not to put much pressure on the fenders. I had two chaise lounge pads that were spaced apart so the fenders did not hit the ground and they were plenty long enough. They provided a totally flat cushioned surface so there was no chance of scratches or twisting.

As to what might be the correct or preferred way to hold the body, I can’t say for sure. Maybe from the front and rear with the trunk open? Kind of a long reach though.
 
Kevin, really appreciate your comments and suggestions. I changed the clicker from 4 to 3 and also checked my rear tire pressure (25) and lowered them to 22. That helped but still not the smooth ride I was expecting. Wednesday I’m going to change the clicker to 2 and see what that does. I haven’t lost or gained any weight and only ride solo , so no differences there. The numbers written on the box are exactly what you wrote: 7 3/4, 7 13/16, 3 clicks. Anyway, I’m hoping this fixes it and I know they’ll work because everyone that has them, loves how much smoother the ride is.

Thanks again!

Quick ? Riding single or 2 up with the setting at 2
 
GoSlo was wondering what you did with the body you took off without doing any damage to it, maybe you can say how it was done or maybe Kevin will chime in since he took off his body on his 2014 or anybody that has done this, guess I could have started a new thread on this but thought I would ask here, also I enjoyed the pics and the write up

All for now Trampas

Sounds like the way GoSlo did it was really good. It's just 4 bolts in the trunk, 1 on either side, underneath the side panels, and then disconnect all the wires between the front of the Tour-Pak and behind the seat. We lifted mine up and carried it over to a couple of saw horses that had a moving blanket on them. Also, emptied everything out of the Tour-Pak first to lighten the weight.

Since I have mud flaps, I could not set it on the floor or any pads.

OK, last post from me on this subject. Changed the clicker from wherever it was set at (3, maybe 4) to 2. Double checked that it's set at 2 and went for a ride.

Whooohooo, what a huge improvement!!!!

Now the shocks are matching what I've read about and was hoping for. I can't even describe the difference from what I was feeling when the clicker was set higher to now. It's true, the little road imperfections and bumps disappear. Not really sure how that clicker works or what exactly it does, but it's amazing what one tiny change can make. Not even going to bother with the adjustment on the top part of the shock.

Thanks to everyone that offered up ideas and comments on this thread. And a big thank you to DK for offering such a great product and then supporting it until you're happy!

Quick ? Riding single or 2 up with the setting at 2

PosseRider...your advice was dead-on. :) For most, setting the clicker at 3 gives the best ride....but not always.

Kevin
 
Sounds like the way GoSlo did it was really good. It's just 4 bolts in the trunk, 1 on either side, underneath the side panels, and then disconnect all the wires between the front of the Tour-Pak and behind the seat. We lifted mine up and carried it over to a couple of saw horses that had a moving blanket on them. Also, emptied everything out of the Tour-Pak first to lighten the weight.

Since I have mud flaps, I could not set it on the floor or any pads.

PosseRider...your advice was dead-on. :) For most, setting the clicker at 3 gives the best ride....but not always.

Kevin

Kevin, I’m curious about you saying some set the shocks differently (2 on one side and 3 on the other). I’m curious to know if there is a preferred side to make firmer (or softer) and why?
 
Kevin, I’m curious about you saying some set the shocks differently (2 on one side and 3 on the other). I’m curious to know if there is a preferred side to make firmer (or softer) and why?

We don't have any data, and there are two theories-

1. It does not make a difference which side. Since the swing arm is solid, both shocks are connected and work as one.

2. It does make a difference, and the softer side should be the side of the road (usually the right side) that has more imperfections in it. Even though the swingarm is solid, it is rubber mounted, and there is some flex in it, plus one can compress while the other rebounds.

Again, we do not have any data to back up one theory over the other. We do have some folks that feel it is more comfortable with one of the shocks at 3 and the other at 2.

I've tried it myself, and for mine and Mary's weight, the roads we ride, etc. we find that both set at 3 is the most comfortable.

All that said, it is not unusual for me to set the shocks up with different preload on the springs...all depends on the bike and the weight. When I do that, it does not matter which side either of the shocks are mounted on.

Kevin
 

Welcome to the Trike Talk Community

Join our vibrant online community dedicated to all things Trikes! Whether you're a seasoned rider or just starting out, this is the place to share experiences, tips, and stories about your three-wheeled adventures. Explore modifications, maintenance advice, and rides, all while connecting with fellow trike enthusiasts from around the globe

Forum statistics

Threads
55,373
Messages
804,519
Members
23,942
Latest member
nmbr1soonerfan
Back
Top Bottom