Battery keeps draining - help!

Dec 17, 2011
37
8
Ash, NC
I have 1999 Gold Wing 1500SE Anniversary Edition/Lehman Trike- bought brand new battery and bike started great before I even got the seat back on. Started bike yesterday and let it run a little. Took it out later in the day to gas it up and everything was fine. Early evening started off to meet people for Christmas parade and bike died about 3 miles from home. Had to call AAA to bring it home. Put it on tender overnight, but tender never turned green. It started up and I ran it for about 15 minutes and it died again while idling. I know lights were drawing juice while idling. Again, could not start, but when I turned off key, I heard a buzzing sound somewhere in the area of the cassette case. Realized I had intercom on and thought it might be that. (When I bought the bike the CB was removed, so I never thought about the intercom). Again, overnight on tender and still red. Went out this a.m. and bike started right up as soon as I let off starter. I am a 69 yr old widow who loves to ride her trike and unfortunately, I am learning many things the hard way! This happened with the old battery and that's why I bought the new one! It's obvious to me that the bike is not charging while being riden, I have the bike being delivered to shop and would like to know if anyone can relate to this problem so I can help them out (and also save some $$$). I really appreciate any input you may provide. Thank you.
arghh.gif
Gypsygal
 
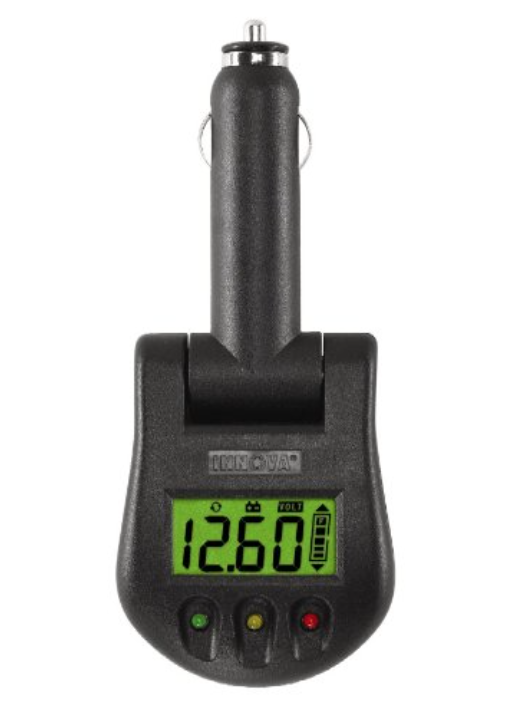
Sounds like your alternator has failed. You'll need a voltmeter to check the battery while bike is running. It should register 13.8 volts at least.

Goldwings have an alternator similar to an auto, just no light or gauge to show when it's not working.

ETA: I carry on of these in my small tool kit, they can be purchased at WalMart also.

https://www.amazon.com/INNOVA-3721-...0206&sr=8-4&keywords=cigar+lighter+volt+meter
 

Attachments

  • Screen Shot 2016-12-04 at 10.51.03 AM.png
    Screen Shot 2016-12-04 at 10.51.03 AM.png
    237.7 KB · Views: 176
Last edited:
I agree .... sounds like an alternator issue. You do need to check voltage at the battery at idle and at a elevated RPM .... 1,500-2,000 rpm or so. Many of your fellow GL riders with the 1500 have accumulated spares that they carry or keep with new brushes.

Yours may just need a cleaning and brushes.

It was a volt meter that I installed on the '85 GL1200 soon after I bought it that alerted me to a stator failure in 1998 ....
.... so when our trike came to us with a Comp-u-fire alternator in Aug 2004 and since "Wife Unit" was going to get her MC license, I installed a combination "Volt Meter / Gear Indicator" (Air Rider brand) in Oct 2004 shortly after we bought it. The volt meter came in really handy when it alerted me on a weekend group ride to Park Vista at Benge Gap with the group when it suffered a fault on a trip near Orchard Gap, two spares showed up out of trailers of others n the group as well as a battery if needed. I got the C-u-f fixed the next week and all has been OK since .... but even I aquired a spare in time.

Might be worth asking around.

Like you, have a 'Lehman GTL trike .... but based on a '97 GL1500SE.

I like the "Patriotic" paint scheme ..... ThumbUp
 
Looking at past posts ..... I see this is not your first battery / charging system ordeal?

Do make sure there is no way for the battery top terminals to contact any part of the bike's frame just above. I keep a piece of rubber cut from something stuffed above the battery.

Mine has had an Odyssey AGM since 2004 so I have never seen a regular wet cell in place on it, but the Odyssey is narrower and so maybe it's closer with OEM wet cells?
 
Alternator/ regulator

[h=2][/h] [h=2][/h]
[h=2]Step by Step Instructions for Testing Your Harley’s Charging System[/h]


1. Battery Test:The battery needs to be a fully charged battery that has been load tested to ensure proper readings. If you are not working with a fully charged and functional battery, all other voltage tests will be incorrect. Most places like Auto Zone, Advance Auto, and Pep Boys will charge and test motorcycle batteries for free. Standing battery Voltage should be 12.5-13.2 DCV.
2. Charging System Voltage Test: Start motorcycle, Measure DC Volts across the battery terminals (you should have a reading of approximately 13.2-15 DC Volts).
3. Check Connections/Wires: Inspect the regulator/stator plug, and check the battery terminals for connection/corrosion. If everything seems to be in order, move on to number 4 below to determine if there’s a failed component.
4. Stator Checks/Rotor Check: Each of the following tests isolate the stator & Rotor, If AC Output test Fails and Resistance Check, and Stator IB Test Pass then Rotor is at fault (Pull Primary covers and inspect rotor for damage).

  • AC Output Check:

  1. Unplug the regulator plug from the stator
  2. Start motorcycle and change Voltmeter to AC volts.
  3. Probe both stator wires with your meter leads.
  4. The motorcycle should be putting out approximately 18-20 ACV per 1,000 rpm. (Reading will vary depending on system, check service manual specification)
  5. Generic Specs:

  • 22 amp system produces about 19-26 VAC per 1,000 rpm
  • 32 amp system produces about 16-20 VAC per 1,000 rpm
  • 45 amp system produces about 19-26 VAC per 1,000 rpm

  • Stator Resistance Check:

  1. Switch your multi meter to Ohm x 1 scale.
  2. Probe each stator wires with meter leads and check resistance on meter.
  3. Resistance should be in the range of 0.1-0.5 Ohms. (Reading will vary depending on system, check service manual for specification)
  4. Generic Specs:

  • 22 amp system produces about 0.2 to 0.4 ohms
  • 32 amp system produces about 0.1 to 0.2 ohms
  • 45 amp system produces about 0.1 to 0.2 ohms

  • Stator IB test or Ground Check:

  1. Switch your multi meter to Ohm x 1 scale.
  2. Probe each stator wire with your positive lead on multi meter and the negative to ground.
  3. There should be no continuity to ground on either wire.
  4. If there is continuity to ground your stator is shorted to ground.
5. Regulator Test: Each of the following tests isolates the regulator only, so if any of these tests fail, the regulator is at fault.

  • Identifying Wires:

  1. Battery Charge Lead– Wire going from regulator to battery positive.
  2. AC output leads– Wires coming from the Stator to regulator.
  3. Ground– Wire from Regulator to ground or regulator may be grounded via the physical bolting to chassis.

  • Regulator Ground Test: Insure the regulator body is grounded or grounding wire is fastened tight to a good ground (you should verify this by checking continuity from regulator body to chassis ground).

  • Fwd/Reverse Bias Test/Diode Test: This check is testing the Diode function to ensure it is regulating the AC current for the stator into DC Current.

  1. Switch multi meter to Diode Scale.
  2. Place your Multi meter positive lead on each AC output wire.
  3. Place your multi meter negative lead on the battery Charge wire.
  4. The meter should read voltage typically around .5 volts.
  5. Next, switch your multi meter leads putting the negative lead on the AC output wires and the Positive lead on the Battery Charge Wire.
  6. The reading should be Infinite.
  7. With your meter on the same setting, place your multi meter positive lead on the regulator ground wire or to the regulator directly, and then place your meter negative lead on the AC output leads.
  8. The meter should read voltage typically around .5 volts.
  9. Next, switch your multi meter leads putting the negative lead on the regulator ground and the Positive lead on the AC output wires.
  10. The reading should be Infinite.
  11. Note: Below is a table to show the readings:
Positive LeadNegative LeadReading
AC output 1Battery charge leadVoltage
AC output 2Battery Charge LeadVoltage
Battery charge leadAC output 1
Battery charge leadAC output 2
GroundAC output 1Voltage
GroundAC output 2Voltage
AC output 1Ground
AC output 2Ground

<tbody>
</tbody>
[h=2]Replacement Components[/h] Batteries
350-430 (97-09 FLT, FLH, FLHT Dressers)
350-431 (82-94 FXR, 84-90 Softail, 71-86 FX, 79-96 XL)
350-432 (91-09 Softail, 97-09 Dyna, 97-03 XL)
350-433 (80-96 FLT, FLHT, 93-96 FLHR)
Stators:
380-864 (L84-90 XL)
240-556 (91-06 XL)
381-259 (70-75 Big Twin 15 Amp)
381-084 (76-80 Big Twin17.8 Amp)
381-260 (81-88 Big Twin 22Amp)
381-202 (89-99 Big Twin 32 Amp)
381-596 (00 Softail, 99-03 Dyna)
381-594 (99-01 Touring)
381-595 (02-05 Touring)
Regulators: (Offered in Chrome and Black, Black Part numbers listed below)
380-798 (84-85 XL)
381-177 (86-90 XL)
381-014 (91 XL)
380-797 (92-93 XL)
380-485 (94-03 XL)
381-835 (04-06 XL)
383-089 (07 XL)
381-252 (70-75 Big Twin)
381-328 (76-80 Big Twin)
381-327 (81-88 Big Twin)
381-277 (89-99 Big Twin)
381-605 (00 Softail)
381-603 (97-01 Touring)
381-606 (00-03 Dyna)
Rotors:
380-373 (70-06 Big Twin 18, 22, 32 Amp Systems)
380-374 (95-06 Big Twin 38 Amp Systems)
380-375 (97-05 Big Twin 45/48 Amp Systems)
383-640 (84-90 XL)
383-641 (91-03 XL)
383-642 (04-09 XL)


Charging%20System%20Test.eml
This is for a harley, similar rules apply to your bike
 
Volt meter results

Battery out put is great.
No output from alternator.

I guess I will have to have the shop take care of it, as I am not mechanically inclined or familiar.

Thank you everyone for your input and advice.

Merry Christmas and Happy New Year!!!

Gypsygal
 

Welcome to the Trike Talk Community

Join our vibrant online community dedicated to all things Trikes! Whether you're a seasoned rider or just starting out, this is the place to share experiences, tips, and stories about your three-wheeled adventures. Explore modifications, maintenance advice, and rides, all while connecting with fellow trike enthusiasts from around the globe

Forum statistics

Threads
55,308
Messages
803,453
Members
23,866
Latest member
TrikeDaddy7.3
Back
Top Bottom