Pro Action Rear Shock Intall Today With Lots Of Pic's On 2017 Tri Glide

Mar 5, 2015
474
370
Bakersfield, CA
Name
Bill
Pro Action Rear Shock Intall Today With Lots Of Pic's On 2017 Tri Glide

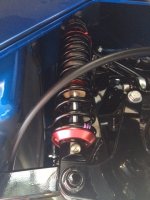
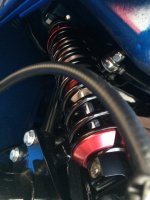
Today I jacked up the 2017 Tri Glide and installed my new Pro Action rear shocks from DK Customs. I just went through the fender wells, really no big deal to do.

A few things I will list to help other with this task.

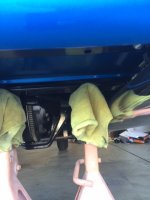
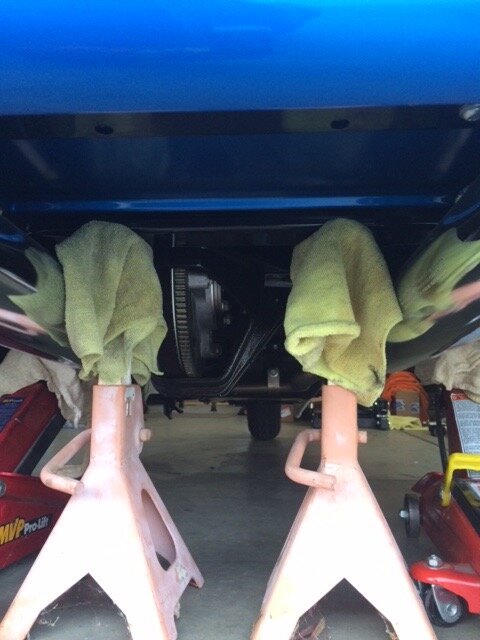
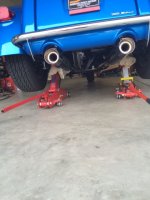
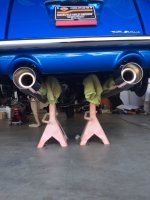
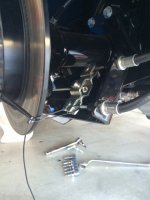
#1 Lift trike and place on jack stands remove tires and wheels. Place strap around grip and front brake lever holding front brake on and chalk front tire. (See Pic's)

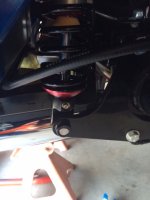
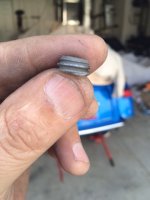
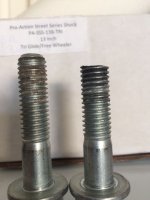
#2 The bottom shock bolts are a hair to long in my opinion (see pic's). I first noticed this on my 2015 Freewheeler when I installed the Comfort Lift. Before starting the shock removal I trimmed about 3 threads of the end of the lower shock bolts before removing them with my thin blade trimmer. Let me explain why I did this. The head of the bolt when backed out all the way hits the frame and the shock dose not want to come out (also will scratch the heck out of the frame). With 3 threads removed it will rock right out of the lower shock mount bracket after the top shock bolt is removed. NOTE with the 3 threads removed the bolt it just comes clear of the threads in the lower shock bracket and the head rest right at the frame and as stated will rock right out after the top shock bolt is removed.

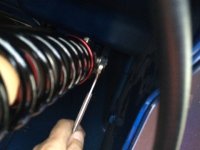
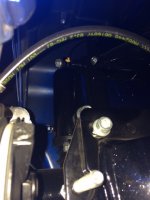
NOTE on the left side to trim the 3 threads of the lower shock bolt if one decides to do this you need to remove and pull the emergency brake cables over out of the way (see pic's).

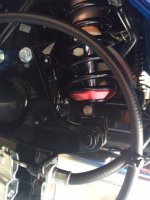
#3 The right side shock went on easy and threaded right on to the shock mounting brackets top and bottom.

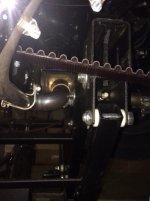
The left shock did not. I had to put a little pressure down ward on the swingarm by placing a padded short bar or long screwdriver between the frame and bottom shock bracket and pull down a little to get the shock bolt straight so it would thread into the lower shock bracket.(I think this was because the drive belt held a little upward tension on the left side). It did not take much effort at all for the bolt to line up.

Then I painted the ends of the bolts where they had been trimmed the 3 threads removed so there would be no rust issues.

It is rainy today so I will give a ride report later.

Ride Safe All, :)
Bill G
 

Attachments

  • IMG_1658.JPG
    IMG_1658.JPG
    82.9 KB · Views: 1,000
  • IMG_1653.JPG
    IMG_1653.JPG
    83.1 KB · Views: 970
  • IMG_1654.JPG
    IMG_1654.JPG
    77.6 KB · Views: 964
  • IMG_1652.JPG
    IMG_1652.JPG
    65 KB · Views: 970
  • IMG_1655.JPG
    IMG_1655.JPG
    89.2 KB · Views: 969
  • IMG_1651.JPG
    IMG_1651.JPG
    77.8 KB · Views: 963
  • IMG_1657.JPG
    IMG_1657.JPG
    65.1 KB · Views: 973
  • IMG_1647.JPG
    IMG_1647.JPG
    63.8 KB · Views: 949
  • IMG_1650.JPG
    IMG_1650.JPG
    63.9 KB · Views: 956
  • IMG_1649.JPG
    IMG_1649.JPG
    85.6 KB · Views: 963
I gotta ask'''' How in the world do you keep the underside of your Trike clean... Like in spotless....:Shrug:

Well two things play into this..

#1 The trike is pretty new #2 Once a month I put my trike on my J&S Jack trike lift, then I lay underneath it and wipe everything down with a micro fiber cloth soaked in hot water and then rung out. Over all this keeps things pretty clean and allows me to inspect everything.

I tend to to be a little anal about things.....Lol :D


:pepper::pepper: :pepper:

Ride Safe All,
Bill G
 
Good to see you have them installed. Looking forward to hearing how you like the ride!

Kevin

I went for a short couple of solo rides this afternoon and the shocks feel excellent Kevin.They tend to absorb the small bumps and imperfections in the road and pretty much float over them. I set them from the 5 clicks they were set at to 4 clicks on the second run out through the country this afternoon (this setting felt even better to me). The rest including sag and spring pre load seemed to be spot on.

I will have or get a better feel for the new Pro Action rear shocks after a long two up ride with my better half. I hope to be getting that done soon weather permitting.

Take Care & Ride Safe,
Bill G

- - - Updated - - -

Underbody car wash:laugh::laugh: looking forward to your report


All for now Trampas

Not quite Trampas but darn close the way I do it keep it clean listed above.....Lol

Ride Safe, :)
Bill G
 
Shocks

VERY good write-up Bill........although I don't have a Free it's articles/input like yours that make this site what it is.......EXCELLENT!
Enjoy the ride my friend,
ThumbUpThumbUp
 
VERY good write-up Bill........although I don't have a Free it's articles/input like yours that make this site what it is.......EXCELLENT!
Enjoy the ride my friend,
ThumbUpThumbUp

Thank you friend,

Please look over the spelling errors, I really stink at typing and grammar sometimes....Lol at myself :)

Ride Safe,
Bill G
 
Looking at your pictures, i saw which shock you installed. Can you tell me why you chose that one over the other they offer at Pro. ?
 
Originally Posted by PosseRider
Looking at your pictures, i saw which shock you installed. Can you tell me why you chose that one over the other they offer at Pro. ?


For me I just decided to by the USA built shock ( support a USA company) with the limited lifetime warranty over the two year on the Bitubo Italian made shocks. Also I felt it would be easier to deal with a USA company if there was ever a warranty issue.

DK Custom claims no noticeable ride diffrence between the two shock brand offerings. So it really just comes down to a personal choice.

Ride Safe All,
Bill G
I thought there were 2 diff. Pro Action
 
Did my 2015 almost the same. Secured the front wheel down to the floor, floor jacks (plural) at the normal jacking point and supported the rear at the bumper brackets. Didn't deal with the park brake bracket. I just loosened the lower shock mount bracket enough to get the bottom bolt out. Left side took almost an hour and a half. Knew what to do on the right side, 20 minutes. Have ridden only twice since but love there is no more bottoming out, even 2up, and sooooo much smoother on secondary roads where we ride the most. I put them in right out of the box. Was going to firm them up first but thought if they wanted all that info first, why not try it. Thank you DK Customs.
 
For me I just decided to by the USA built shock ( support a USA company) with the limited lifetime warranty over the two year on the Bitubo Italian made shocks. Also I felt it would be easier to deal with a USA company if there was ever a warranty issue.

DK Custom claims no noticeable ride diffrence between the two shock brand offerings. So it really just comes down to a personal choice.

Ride Safe All,
Bill G

:pepper::Agree:, great choice and great reason!!

Roger
 
I thought there were 2 diff. Pro Action

DK Customs sells two styles of rear shocks, one is manufactured by Pro Action there street series line a USA company. The other shocks are manufactured by Bitubo out of Italy an Italian company. The Bitubo twin action shocks cost $252.00 less. DK Custom claims no noticeable diffrence in ride between the two in there testing.

DK has a full right up on there web page concerning the differences between the build and warranty between the two brands of shocks.

Ride Safe, :)
Bill G
 
I wasn't thinking when I posted earlier, I know you have the J & S jack and was wondering why you didn't use it instead of the method you used, just curious, I know with the jack you wouldn't have to strap the front brake lever at all, I seen your two little floor jacks, which I don't have but why use the jack stands, I may not be thinking this thru just right but if you could explain why this way you did it instead of using the J & S jack could help out, inquiring minds that might be doing this down the road to help them decide if they could do this themselves or hire it done.

As for your under body carriage being clean, I'm the same way, I'm anal about keeping all my bikes and my truck clean.


All for now Trampas
 
I thought there were 2 diff. Pro Action

There are many different Pro-Action Configurations/lengths/spring weights/valving, and the same for the Twin Adjustable Bitubo Shocks.

See more info HERE

Kevin

- - - Updated - - -

Did my 2015 almost the same. Secured the front wheel down to the floor, floor jacks (plural) at the normal jacking point and supported the rear at the bumper brackets. Didn't deal with the park brake bracket. I just loosened the lower shock mount bracket enough to get the bottom bolt out. Left side took almost an hour and a half. Knew what to do on the right side, 20 minutes. Have ridden only twice since but love there is no more bottoming out, even 2up, and sooooo much smoother on secondary roads where we ride the most. I put them in right out of the box. Was going to firm them up first but thought if they wanted all that info first, why not try it. Thank you DK Customs.

Good to hear you both are enjoying a more comfortable ride!

:)

Kevin
 
I wasn't thinking when I posted earlier, I know you have the J & S jack and was wondering why you didn't use it instead of the method you used, just curious, I know with the jack you wouldn't have to strap the front brake lever at all, I seen your two little floor jacks, which I don't have but why use the jack stands, I may not be thinking this thru just right but if you could explain why this way you did it instead of using the J & S jack could help out, inquiring minds that might be doing this down the road to help them decide if they could do this themselves or hire it done.

As for your under body carriage being clean, I'm the same way, I'm anal about keeping all my bikes and my truck clean.g

All for now Trampas


Trampas,

The reason I did not use the J&S Jack trike lift for the rear shock removal is because it supports the trike on the front of the swing arm underneath the trike (see pic). I needed the swingarm and rear axle to move freely not supporting any of the trikes weight to remove and install the rear shocks. This allowed me to jack up or lower the swingarm and axle freely if needed to get the shocks back on or in place. The jack stands supported the frame only not the swingarm or axle.

In the pic below you can see the J&S Jacks rear support lift arm lifting on the trikes swingarm behind the exaust crossover. This lift arms mechanism is cable operated into place after the trike jack has been placed under the trike. You can see the arms lift mechanism in the pic.

Ride Safe Friend, :)
Bill G
 

Attachments

  • IMG_1610.JPG
    IMG_1610.JPG
    55.3 KB · Views: 400
Did my 2015 almost the same. Secured the front wheel down to the floor, floor jacks (plural) at the normal jacking point and supported the rear at the bumper brackets. Didn't deal with the park brake bracket. I just loosened the lower shock mount bracket enough to get the bottom bolt out. Left side took almost an hour and a half. Knew what to do on the right side, 20 minutes. Have ridden only twice since but love there is no more bottoming out, even 2up, and sooooo much smoother on secondary roads where we ride the most. I put them in right out of the box. Was going to firm them up first but thought if they wanted all that info first, why not try it. Thank you DK Customs.

I laughed out loud when I read your post about the time it took to install the shocks. Just put the Bitumos on about a week ago and it was the same thing.

About one and a half hours for the first side and less than half an hour for the other side.

Bill G had a great tip about shortening the bolts.

They were tough as hell to get out because of the length.
 
I laughed out loud when I read your post about the time it took to install the shocks. Just put the Bitumos on about a week ago and it was the same thing. About one and a half hours for the first side and less than half an hour for the other side.

Bill G had a great tip about shortening the bolts. They were tough as hell to get out because of the length.

You can also loosen the 3 bolts on the lower shock brackets and get enough room to get the lower shock bolts out. But then you have to remove the 3 lower bracket bolts and add blue lock tight to them and re torque them. As stated or my tip that I gave I just decided to remove or trim the 3 threads off the lower shock bolts instead.

In the big picture, I really could have easily got the job done without removing the 3 threads from the lower shock bolts.

Ride Safe All, :)
Bill G
 
Well two things play into this..
#1 The trike is pretty new #2 Once a month I put my trike on my J&S Jack trike lift, then I lay underneath it and wipe everything down with a micro fiber cloth soaked in hot water and then rung out. Over all this keeps things pretty clean and allows me to inspect everything.
I tend to to be a little anal about things.....Lol :D

Ride Safe All,
Bill G

Curious that as you have the J&S Lift - Why not use it to replace the shocks? jc
 
Curious that as you have the J&S Lift - Why not use it to replace the shocks? jc

The J&S Jacks rear lift arm mechanism rest on the swing arm just behind the exaust cross over. The front arm of the jack rest on the frame underneath the trike. This does not allow the rear swing arm to swing freely up and down which is needed or preferred for rear shock replacement. You may need to manipulate the swing arm freely up and down a little with a floor jack to get your shocks back on. This small manipulation was needed on my left side re install of the rear shocks. This was the reason why jack stands were used supporting the weight of the trike from the frame only not from the swing arm at all leaving it free to move as needed.

See pic of rear support arm from J&S Jack back lift arm in place.

Ride Safe, :)
Bill G
 

Attachments

  • IMG_1610.JPG
    IMG_1610.JPG
    55.3 KB · Views: 408
so you supported the trike on jackstands right above the mufflers ? sure would like to see some more pic's of your support points.


The trike rear shock install needs to be supported from the frame. There are two cross overs on the frame under the trunk. Place the jack stands on the one in the front by the rear axle. Place jack stands as far apart as possible without resting against the mufflers. Then the rear axle can be manipulated up and down as needed freely with floor jacks during the rear shock replacement. The jack stands now support the trikes weight from the frame.

Pic's with jack stands in place with and without floor jacks to lift trike to place jack stands in place. Also floor jacks can be used to manipulate swing arm up and down freely a little during the rear shock replacement.

Ride Safe, :)
Bill G
 

Attachments

  • IMG_1704.JPG
    IMG_1704.JPG
    66.6 KB · Views: 404
  • IMG_1705.JPG
    IMG_1705.JPG
    74.2 KB · Views: 404
Great posts Bill. I like stuff like this to determine if I want to tackle the job myself or let pros do it. I am quite mechanically challenged.....unless I know what I'm doing. :)

I have the J&S jack also and have a bit of a problem getting it to work correctly. It is next to impossible to get the small section to lift because of the clearance between the frame and the belt. Do you have the same problem? I also had to rotate the exhaust clamp on the right side to get it under the frame.
The first time I used it the cable end for the small section broke and J&S sent me a replacement immediately.

I do have another problem with the small section lift mechanism. I've tried a number of lubes, but it keeps sticking and once it locked and I had to hit it with a hammer and screwdriver to get it back down. The worst part was getting it put back together. That was not fun. You need 3 or 4 hands. :)

Cleaning the underside is more then anal. :)

Do you do that with your cars too? :)

I use to be "ANAL" about cleaning/waxing my vehicles - especially my Vettes because I use to show them, but as I got older, I realized I liked riding/driving them more. Have you ever sat down for an hour+ popping stones and pebbles out of you tire treads. :) :) :)

I'm lucky if I even wash let along wax my bike anymore. I take 3 or 4 long trips a year so I'm almost constantly on the road so it doesn't make sense cleaning it much.

Can't wait to get my shocks installed this spring. Thanks again for your posts.(Yes)


Lol... Anal is a kind word for what's wrong with me. I am only really this way with my Harley and my Guitars. I do try to take care of over all the rest as best I can.

The J&S jack has to be placed just right and a clamp as you stated needs to be rotated. Try adjusting the bolts just a hair loose on the mechanism so it does not bind up or drag through its operation.That's what I did. My jack when new would hang up a little and that is what I did to solve the issue.

Take Care And Ride Safe, :)
Bill G

Mine is pretty loose-almost too loose. It seems to want to bind. I'll try tightening it a bit.
 
Really nice write up on the install, much appreciated! I have a question that either you can help with or maybe Kevin. This is in regards to the lower adjustment on the shocks. It is real easy to see that the Bitubo adjustment has a little lever that extends outward and you just swing it which ever direction you want to adjust. However I can not see how you adjust the pro action shocks. I know there is an adjustment on the lower end maybe someone has a good photo and explanation of how to adjust the bottom. Is there a tool that is needed?
 

Welcome to the Trike Talk Community

Join our vibrant online community dedicated to all things Trikes! Whether you're a seasoned rider or just starting out, this is the place to share experiences, tips, and stories about your three-wheeled adventures. Explore modifications, maintenance advice, and rides, all while connecting with fellow trike enthusiasts from around the globe

Forum statistics

Threads
55,551
Messages
807,141
Members
24,102
Latest member
dhinzman1
Back
Top Bottom